本文旨在用最清楚的结构去实现一些组件的基本功能。希望和大家一起学习,共同进步
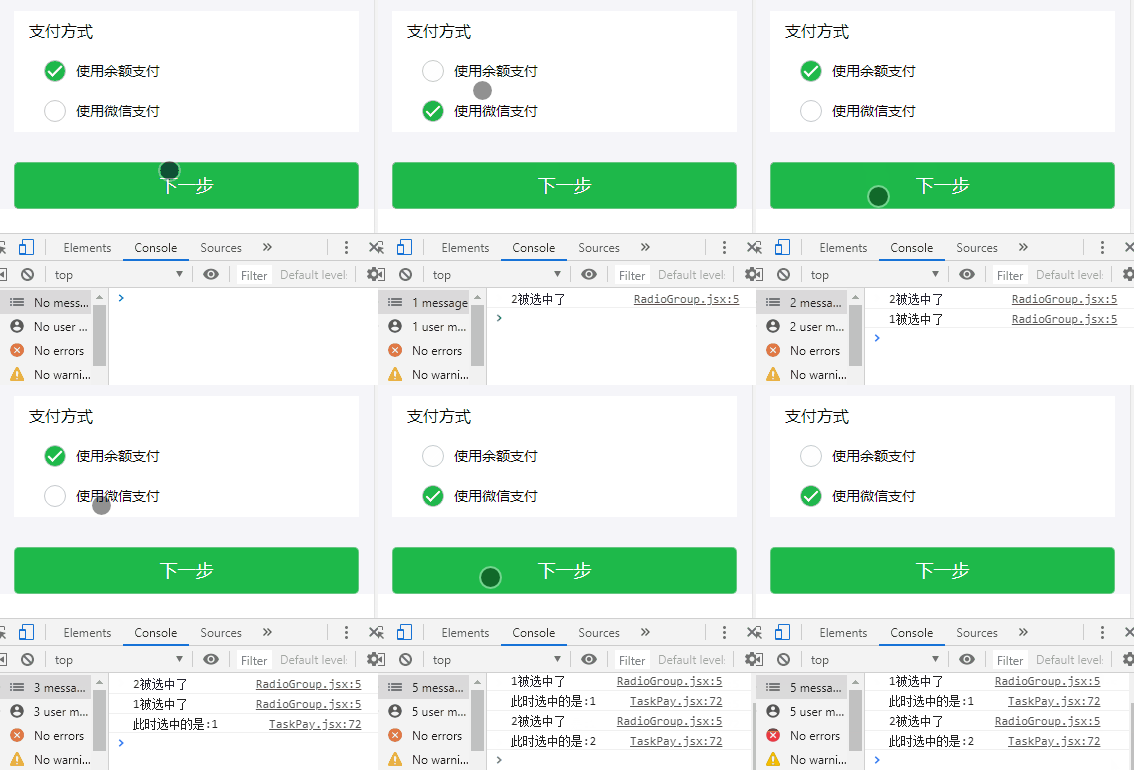
效果展示:测试组件:class Test extends Component {c
本文旨在用最清楚的结构去实现一些组件的基本功能。希望和大家一起学习,共同进步
效果展示:

测试组件:
class Test extends Component {
  constructor(props) {
    super(props)
    this.state = {
      active:1
    }
  }
  onGroupChange(value) {
    this.setState({
      active: value
    })
  }
  render() {
    return (
     <div>
      <RadioGroup onChange={this.onGroupChange.bind(this)} active={this.state.active}>
         <Radio value={1}>使用余额支付</Radio>
         <Radio value={2}>使用微信支付</Radio>
      </RadioGroup>
      <Button onClick={()=>{
             console.log("此时选中的是:"+this.state.active)
           }}>下一步</Button>
     </div>
      )
  }
}
export default Test;
RadioGroup:
import React, { Component } from 'react';
class RadioGroup extends Component {
  handleActiveChange(value) {
    console.log(`${value}被选中了`)
    this.props.onChange(value)
  }
  render() {
    return (
      <div>
        {
          React.Children.map(this.props.children, child => {
            let isActive = this.props.active === child.props.value ? true : false
            return React.cloneElement(child, {
              label: child.props.children,
              value: child.props.value,
              active: isActive,
              onClick: this.handleActiveChange.bind(this)
            })
          })
        }
      </div>
    )
  }
}
export default RadioGroup;
Radio.jsx:
import React, { Component } from 'react';
import "./radio.scss"
class Radio extends Component {
  render() {
    return (
      <div className="radio-wrap" onClick={this.props.onClick.bind(this,this.props.value)}>
        <div className="left">
          <div className={`circle ${this.props.active === true ? 'active' : ''} `}>
            <div className="fork"></div>
          </div>
          <div className="label">{this.props.label}</div>
        </div>
      </div>
    )
  }
}
export default Radio;
Radio.scss:
.radio-wrap {
  height: 40px;
  background-color: #ffffff;
  display: flex;
  align-items: center;
  padding: 0px 30px;

  &:active {
    background-color: rgb(221, 221, 221);
  }

  .left {
    display: inline-block;

    .circle {
      display: inline-block;
      height: 22px;
      width: 22px;
      box-sizing: border-box;
      border: 1px solid #c5c9cd;
      border-radius: 50%;
      background-color: #ffffff;
      position: relative;


    }
    .active{
      background-color: #1eb94a;
      .fork {
        height: 12px;
        width: 5px;
        border-right: 1.5px solid #ffffff;
        border-bottom: 1.5px solid #ffffff;
        position: absolute;
        top: 40%;
        left: 50%;
        transform: translate(-50%, -50%) rotate(45deg);
      }
    }

    .label {
      vertical-align: top;
      margin-left: 10px;
      display: inline-block;
      height: 22px;
      line-height: 22px;
      font-size: 14px;
    }
  }
}
到此这篇关于react实现Radio组件的示例代码的文章就介绍到这了,更多相关react实现Radio组件内容请搜索好代码网以前的文章或继续浏览下面的相关文章希望大家以后多多支持好代码网!


