本文实例讲述了Android开发实现Gallery画廊效果的方法。分享给大家供大家参考,具体如下:
画廊 使用Gallery表示,按水平方向显示内容,并且可以用
本文实例讲述了Android开发实现Gallery画廊效果的方法。分享给大家供大家参考,具体如下:
画廊 使用Gallery表示,按水平方向显示内容,并且可以用手指直接拖动图片移动,一般用来浏览图片,被选中的选项位于中间,可以响应事件显示信息。
xml布局文件基本语法
<Gallery
属性列表
/>
Gallery支持4中xml属性
|
属性名称
|
描述
|
|||||||||||||||||||||||||||||||||||||||
|
android:animationDuration
|
设置布局变化时动画的转换所需的时间(毫秒级)。仅在动画开始时计时。该值必须是整数,比如:100。
|
|||||||||||||||||||||||||||||||||||||||
|
android:gravity
|
指定在对象的X和Y轴上如何放置内容。指定一下常量中的一个或多个(使用 “|”分割)
|
|||||||||||||||||||||||||||||||||||||||
|
android:spacing
|
(译者注:设置图片之间的间距)
|
|||||||||||||||||||||||||||||||||||||||
|
android:unselectedAlpha
|
设置未选中的条目的透明度(Alpha)。该值必须是float类型,比如:“1.2”
|
效果的具体实现过程
layout:
<?xml version="1.0" encoding="utf-8"?>
<LinearLayout xmlns:android="http://schemas.android.com/apk/res/android"
  android:layout_width="match_parent"
  android:layout_height="match_parent"
  android:orientation="vertical" >
  <Gallery
    android:id="@+id/gallery"
    android:spacing="5px"     //设置列表项之间的间距为5像素
    android:unselectedAlpha="0.5" //设置未被选中的列表项的透明度
    android:layout_width="match_parent"
    android:layout_height="wrap_content" />
</LinearLayout>
Activity:
package xqx;
import com.example.xqx_lianxi.R;
import android.app.Activity;
import android.content.res.TypedArray;
import android.os.Bundle;
import android.view.View;
import android.view.ViewGroup;
import android.widget.AdapterView;
import android.widget.AdapterView.OnItemClickListener;
import android.widget.BaseAdapter;
import android.widget.Gallery;
import android.widget.ImageView;
import android.widget.Toast;
public class MainGallery extends Activity{
   //设置画廊图片
  private int[] imageId = new int[] { R.drawable.ic_launcher,R.drawable.ic_launcher,R.drawable.ic_launcher,R.drawable.ic_launcher,R.drawable.ic_launcher,R.drawable.ic_launcher};
  @Override
  protected void onCreate(Bundle savedInstanceState) {
    // TODO Auto-generated method stub
    super.onCreate(savedInstanceState);
    setContentView(R.layout.main_gallery);
    //获取Gallery组件
    Gallery gallery = (Gallery) findViewById(R.id.gallery);
    BaseAdapter adapter = new BaseAdapter() {
        //获取当前选项ID
        @Override
        public long getItemId(int position) {
          return position;
        }
        //获取当前选项值
        @Override
        public Object getItem(int position) {
          return position;
        }
        //获取数量
        @Override
        public int getCount() {
          return imageId.length;
        }
      @Override
      public View getView(int position, View convertView, ViewGroup parent) {
        ImageView imageview;  //声明ImageView的对象
        if (convertView == null) {
          imageview = new ImageView(MainGallery.this); //创建ImageView的对象
          imageview.setScaleType(ImageView.ScaleType.FIT_XY); //设置缩放方式
          imageview.setLayoutParams(new Gallery.LayoutParams(500, 400));
          TypedArray typedArray = obtainStyledAttributes(R.styleable.Gallery);
          imageview.setBackgroundResource(typedArray.getResourceId(
              R.styleable.Gallery_android_galleryItemBackground,
              0));
          imageview.setPadding(5, 0, 5, 0); //设置imageview的内边距
        }
        else
        {
          imageview = (ImageView) convertView;
        }
        imageview.setImageResource(imageId[position]);
        return imageview;
      }
    };
      //将适配器与Gallery关联
      gallery.setAdapter(adapter);
      gallery.setSelection(imageId.length / 2); //默认显示的图片的id
      //画廊图片的点击事件
      gallery.setOnItemClickListener(new OnItemClickListener() {
        @Override
        public void onItemClick(AdapterView<?> parent, View view,
            int position, long id) {
          Toast.makeText(MainGallery.this,
              "第" + String.valueOf(position+1) + "张图片被选中",
              Toast.LENGTH_SHORT).show();
        }
      });
}
}
最后在res/values/string.xml中添加一段代码 ,这里对应activity中的51行
<declare-styleable name="Gallery">
    <attr name="android:galleryItemBackground" />
</declare-styleable>
这样便完成了一个画廊的效果
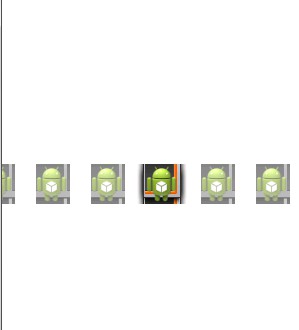
效果图:

可以看到 一共有6张图片 默认显示第4张
gallery.setSelection(imageId.length / 2); //默认显示的图片的id
更多关于Android相关内容感兴趣的读者可查看本站专题:《Android开发入门与进阶教程》、《Android调试技巧与常见问题解决方法汇总》、《Android基本组件用法总结》、《Android视图View技巧总结》、《Android布局layout技巧总结》及《Android控件用法总结》
希望本文所述对大家Android程序设计有所帮助。


