1、安装前的准备

2、安装 mingw64
2.1、编译器 mingw 与 visual studio 之间的选择
Rust 底层是依赖C/C++的 编译器,所以需要先安装C/C++编译环境。
Windows上C/C++ 的 编译器 有两种:
微软 的 Visual Studio (msvc)
GNU 的 Mingw (gnu): 官网地址:https://www.mingw-w64.org/
Rust 默认使用的是 Visual Studio, 使用默认选项就能安装上,缺点是 Visual Studio 体积比较大,下载安装都要好几个G,考虑到体积大小、时间和网速等原因 , 我选择使用 mingw(mingw64) 作为 C/C++的编译器 。
另外,上面两个编译器 分别对应的是 x86_64-pc-windows-msvc 和 x86_64-pc-windows-gnu ,后面修改默认配置时会涉及到 。
2.2、下载
mingw 分为32位和64位,本次选择的是mingw64 。
mingw 是一个开源项目,有许多组织参与。
mingw64 的环境下的安装操作,看看下载页面 https://www.mingw-w64.org/downloads/。
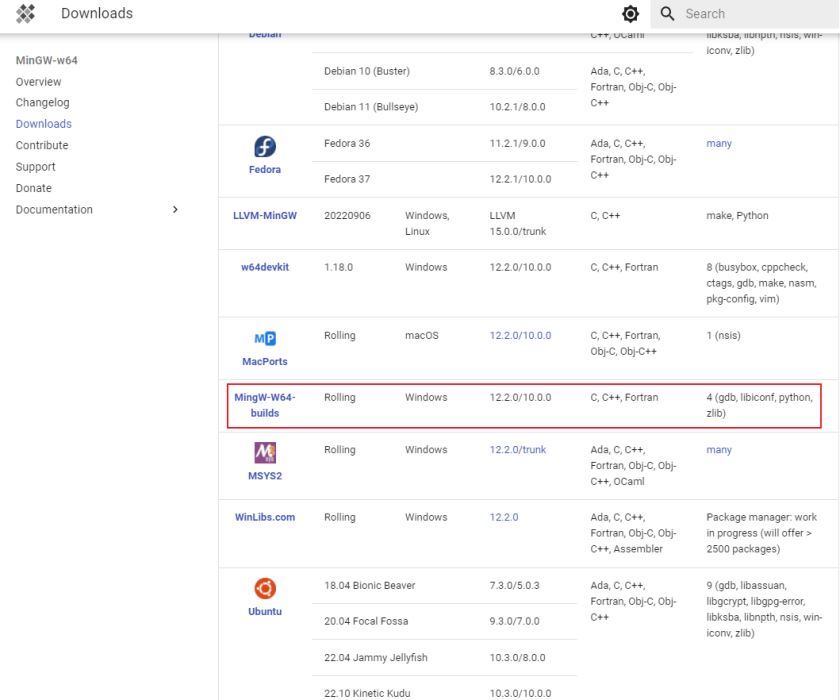
可以看到有很多种 mingw-64的构建方式,支持windows的也不少,本人目前用的是上图中圆圈标记的那个。
Mingw-builds 的构建版本
地址为:https://github.com/niXman/mingw-builds-binaries/releases
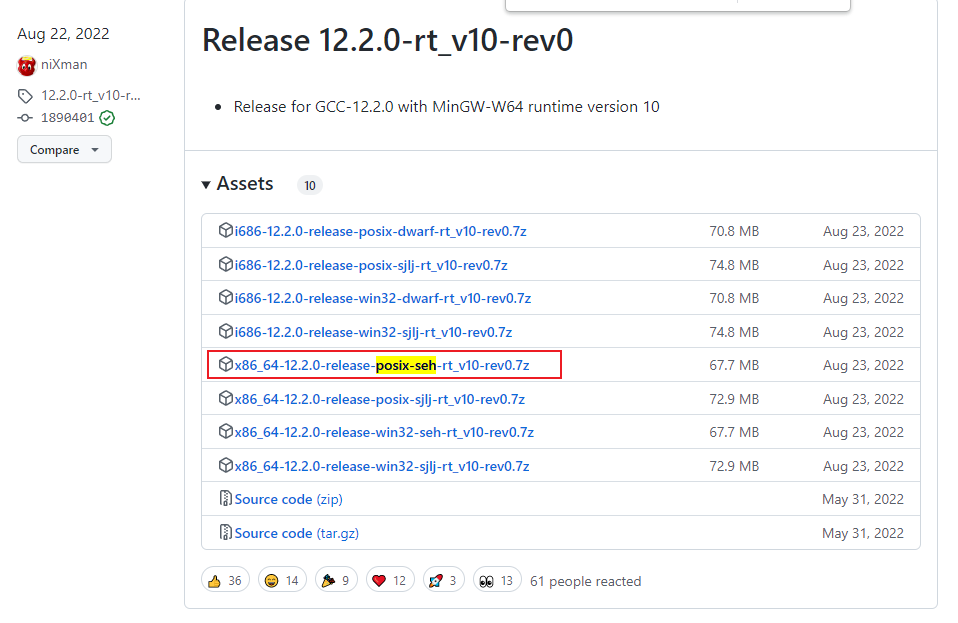
选择 x86_64-12.2.0-release-posix-seh-rt_v10-rev0.7z 下载。
这个压缩包才67MB多点,比安装msvc节省下好几个小时 和 存储空间 。
mingw 各个版本的区别
操作系统版本:
x86_64:64位版本i686: 32位版本
线程模型:
posix:相比 win32,posix 对 C++11的标准库支持的更好。win32:
如果你想在代码开发时进行断点调试,推荐用 posix。
异常处理方式:
seh:64位系统可用,使用windows自身的异常处理机制。dwarf:只支持32位,需要在可执行程序中添加额外的调试信息,程序体积较大。sjlj: 比起其他异常处理会慢得多。
2.3、安装
下载得到的 x86_64-12.2.0-release-posix-seh-rt_v10-rev0.7z 是一个 免安装 版本,可以直接解压在你想要的目录下(目录名称不要有中文)。
2.4、配置
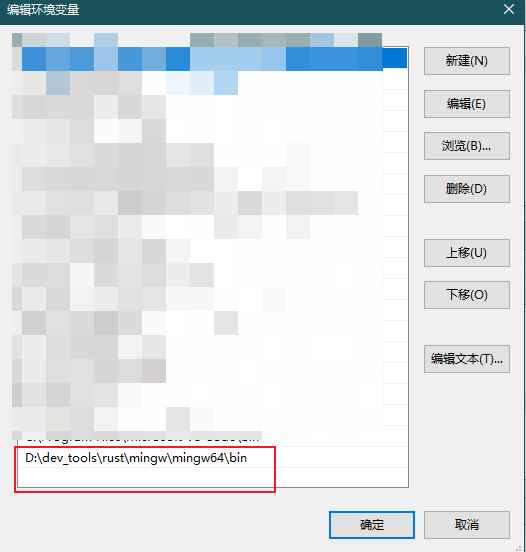
修改环境变量 path , 添加解压目录下的 bin 。
2.5、测试
打开cmd窗口,输入 gcc --version,如果显示如下内容,则配置成功:

3、安装 Rust
3.1 、从Rust的官网下载 rustup-init
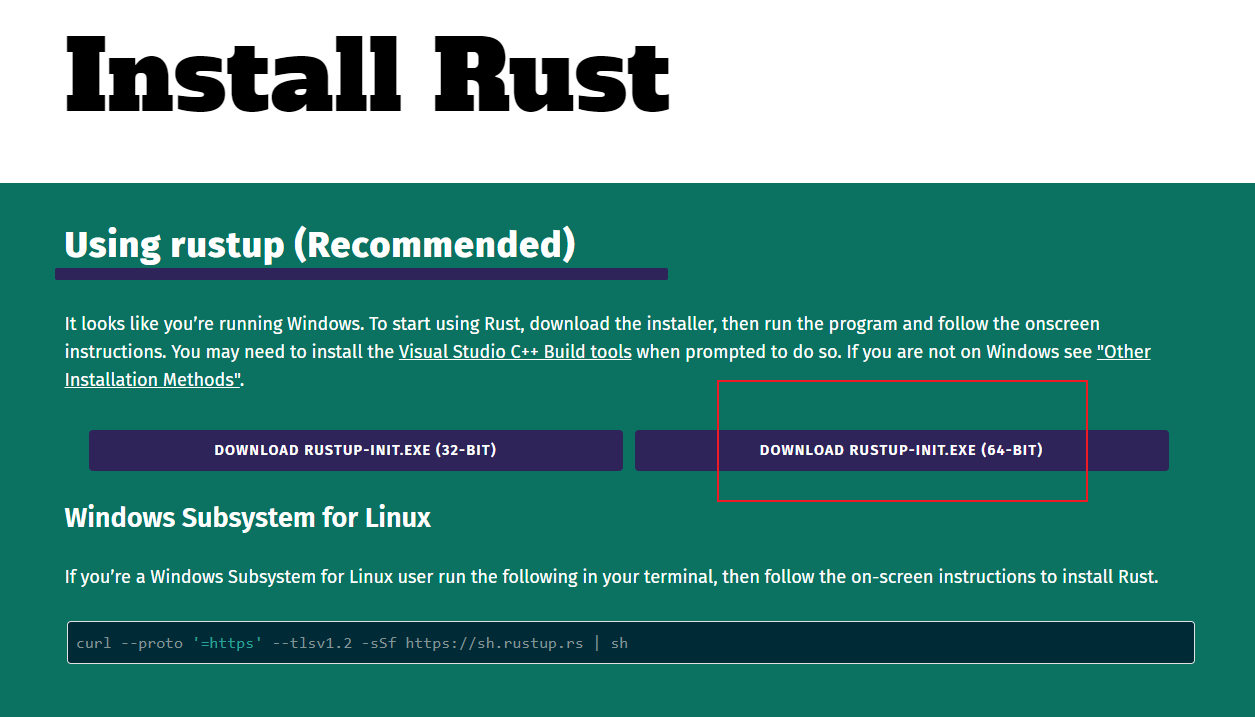
3.2、配置国内镜像地址
rustup-init 为在线安装工具,默认的安装源为国外的站点,网速较慢,可设置环境变量,使其从国内镜像中下载。
在系统环境变量中添加如下变量(二选一即可):
### 下面的配置 二选一即可

# 中国科学技术大学
RUSTUP_DIST_SERVER=https://mirrors.ustc.edu.cn/rust-static
RUSTUP_UPDATE_ROOT=https://mirrors.ustc.edu.cn/rust-static/rustup

# 清华大学
RUSTUP_DIST_SERVER=https://mirrors.tuna.tsinghua.edu.cn/rustup
RUSTUP_UPDATE_ROOT=https://mirrors.tuna.tsinghua.edu.cn/rustup/rustup

3.3、运行 rustup-init
打开cmd窗口,运行 rustup-init.exe ,显示如下内容:
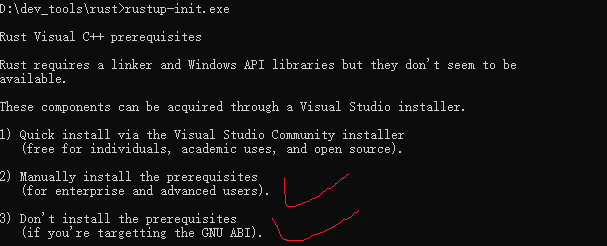
上图是 要求必须 安装 C/C++ 的编译环境。默认是 visual studio 安装器,而我们使用是 mingw64,因此需要手动修改。
此处,选择2或3均可。
输入
2
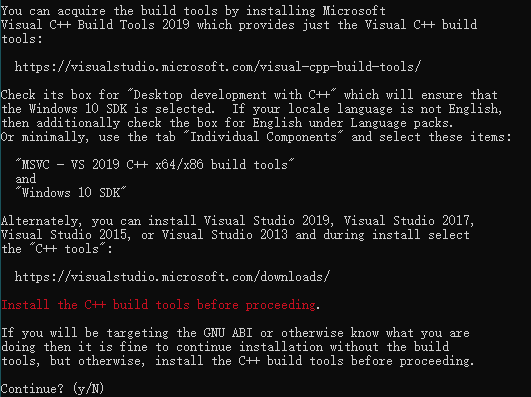
输入
y

输入 2 ,进行自定义安装。
2

输入 x86_64-pc-windows-gnu ,表示我要安装 64位的 gnu版本 。
x86_64-pc-windows-gnu
接下来都是回车,使用默认配置。
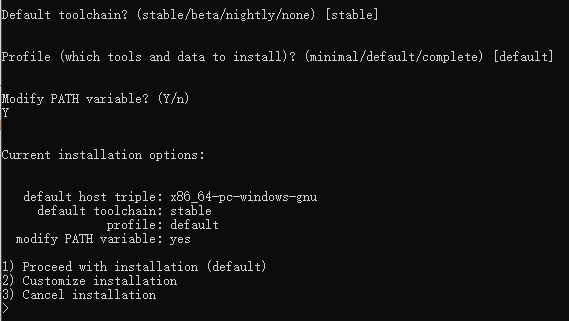
上面配置完毕后,到这一步是回车,开始安装。
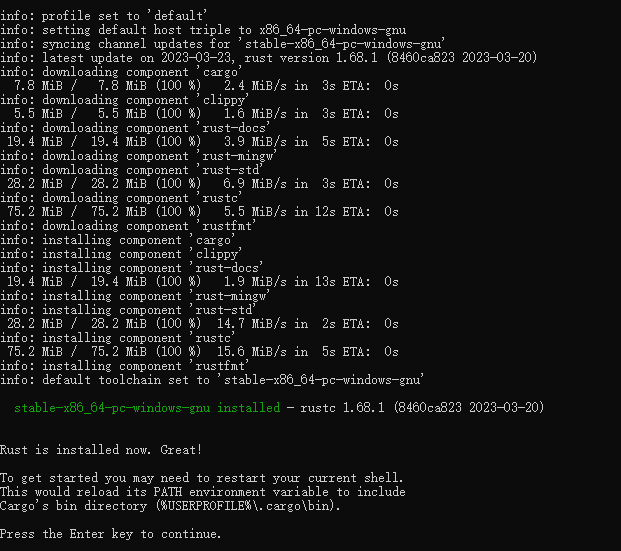
安装过程如下图所示 。安装过程中要从网络下载很多东西,请耐心等待。
3.4、验证
安装完成后,重新打开 dos 命令行窗口,输入rustc --version,输出
C:\Users\admin>rustc --version
rustc 1.68.1 (8460ca823 2023-03-20)

表示安装成功。
3.5、rustup 常用命令
# 查看rustc版本
rustc --version

# 显示当前安装的工具链信息
rustup show
# 检查安装更新
rustup update
# 卸载
rustup self uninstall
# 设置当前默认工具链
rustup default stable-x86_64-pc-windows-gnu
# 查看帮助
rustup -h

# -------------------------->配置工具链
# 查看工具链
rustup toolchain list
# 安装工具链
rustup toolchain install stable-x86_64-pc-windows-gnu
# 卸载工具链
rustup toolchain uninstall stable-x86_64-pc-windows-gnu
# 设置自定义工具链
rustup toolchain link <toolchain-name> "<toolchain-path>"

# -------------------------->配置一个目录以及其子目录的默认工具链
# 查看已设置的默认工具链
rustup override list
# 设置该目录以及其子目录的默认工具链
rustup override set <toolchain> --path <path>
# 取消目录以及其子目录的默认工具链
rustup override unset --path <path>

# -------------------------->配置工具链的可用目标
# 查看目标列表
rustup target list
# 安装目标
rustup target add <target>
# 卸载目标
rustup target remove <target>
# 为特定工具链安装目标
rustup target add --toolchain <toolchain> <target>

# -------------------------->配置 rustup 安装的组件
# 查看可用组件
rustup component list
# 安装组件
rustup component add <component>
# 卸载组件
rustup component remove <component>
4、cargo 配置
cargo 是rust的包管理工具,类似于python的pip,默认的cargo会从国外网站下载包,也可以修改为从科大下载。
4.1、配置 cargo 国内镜像
在用户主目录的 .cargo 目录下新建一个文件,命名为 config(没有扩展名),并输入以下内容:
[source.crates-io]
registry = "https://github.com/rust-lang/crates.io-index"
replace-with = 'ustc'

## 二选择一
## replace-with = 'XXX' 选择配置

# 中国科学技术大学
[source.ustc]
registry = "git://mirrors.ustc.edu.cn/crates.io-index"

# 清华大学
[source.tuna]
registry = "https://mirrors.tuna.tsinghua.edu.cn/git/crates.io-index.git"
4.2、cargo 基础命令
 查看cargo版本
cargo --version

# 新建项目
cargo new <project_name>

# 构建项目
cargo build

# 运行项目
cargo run

# 检查项目
cargo check

# 查看帮助
cargo -h
5、hello world
经过了一系列的安装配置,将rust运行环境配置 完毕,下面写一个 hello world 。
我们通过 cargo 来创建项目,在 cmd 窗口中输入 cargo new hello --bin ,
cargo new hello --bin

cargo 已经帮我们创建好了 hello 项目,自动生成了一系列文件:
hello
└──
   ├── .gitignore
   ├── Cargo.toml
   └── src
        └── main.rs
其中 src 下的 main.rs 为 rust代码文件,其内容为:
fn main() {
    println!("Hello, world!");
}
进入 hello 项目,编译和运行这个项目:
cd  hello

cargo run
   Compiling hello v0.1.0 (C:\Users\admin\Desktop\tt\hello)
    Finished dev [unoptimized + debuginfo] target(s) in 15.61s
     Running `target\debug\hello.exe`
Hello, world!
上面完整的操作记录:

6、idea 配置 Rust 插件
6.1、下载 Rust 插件

6.2、下载源码
在 cmd 窗口中 输入如下命令,下载源码 (idea 会自动找到路径)
rustup component add rust-src

6.3、查看配置

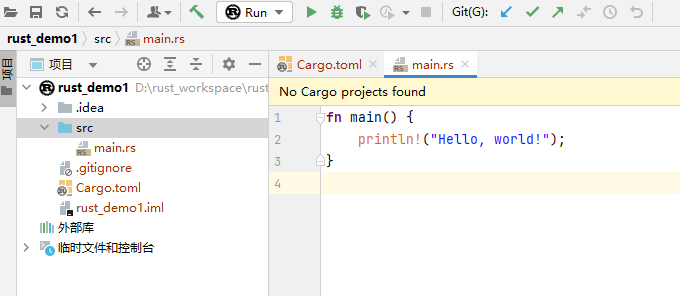
6.4、创建项目
1)选择 Rust,其它默认,点击下一步。

2)选择路径,输入项目名称: rust_demo1 。
3)创建项目成功,如下图所示。
7、参考文章
https://blog.csdn.net/zhmh326/article/details/103805485
https://zhuanlan.zhihu.com/p/492412918?utm_id=0
https://www.cnblogs.com/lixueren-wy/articles/16934078.html
https://blog.csdn.net/saibeifeng187/article/details/107567702
到此这篇关于在win10上使用mingw64编译器配置Rust开发环境和idea 配置Rust 插件的文章就介绍到这了,更多相关mingw64编译器配置Rust开发环境内容请搜索好代码网以前的文章或继续浏览下面的相关文章希望大家以后多多支持好代码网!


