本文以部署 Go Web 程序为例,介绍了在 CentOS7 服务器上部署 Go 语言程序的若干方法。
部署Go语言项目
本文以部署 Go Web 程序为例,介绍了在 CentOS7 服务器上部署 Go 语言程序的若干方法。
独立部署
Go 语言支持跨平台交叉编译,也就是说我们可以在 Windows 或 Mac 平台下编写代码,并且将代码编译成能够在 Linux amd64 服务器上运行的程序。
对于简单的项目,通常我们只需要将编译后的二进制文件拷贝到服务器上,然后设置为后台守护进程运行即可。
编译
编译可以通过以下命令或编写 makefile 来操作。
CGO_ENABLED=0 GOOS=linux GOARCH=amd64 go build -o ./bin/bluebell
下面假设我们将本地编译好的 bluebell 二进制文件、配置文件和静态文件等上传到服务器的/data/app/bluebell目录下。
补充一点,如果嫌弃编译后的二进制文件太大,可以在编译的时候加上-ldflags "-s -w"参数去掉符号表和调试信息,一般能减小20%的大小。
CGO_ENABLED=0 GOOS=linux GOARCH=amd64 go build -ldflags "-s -w" -o ./bin/bluebell
如果还是嫌大的话可以继续使用 upx 工具对二进制可执行文件进行压缩。
我们编译好 bluebell 项目后,相关必要文件的目录结构如下:
├── bin
│ └── bluebell
├── conf
│ └── config.yaml
├── static
│ ├── css
│ │ └── app.0afe9dae.css
│ ├── favicon.ico
│ ├── img
│ │ ├── avatar.7b0a9835.png
│ │ ├── iconfont.cdbe38a0.svg
│ │ ├── logo.da56125f.png
│ │ └── search.8e85063d.png
│ └── js
│  ├── app.9f3efa6d.js
│  ├── app.9f3efa6d.js.map
│  ├── chunk-vendors.57f9e9d6.js
│  └── chunk-vendors.57f9e9d6.js.map
└── templates
 └── index.html
nohup
nohup 用于在系统后台 不挂断 地运行命令,不挂断指的是退出执行命令的终端也不会影响程序的运行。
我们可以使用 nohup 命令来运行应用程序,使其作为后台守护进程运行。由于在主流的 Linux 发行版中都会默认安装 nohup 命令工具,我们可以直接输入以下命令来启动我们的项目:
sudo nohup ./bin/bluebell conf/config.yaml > nohup_bluebell.log 2>&1 &
其中:
- ./bluebell conf/config.yaml是我们应用程序的启动命令
- nohup ... &表示在后台不挂断的执行上述应用程序的启动命令
- > nohup_bluebell.log表示将命令的标准输出重定向到 nohup_bluebell.log 文件
- 2>&1表示将标准错误输出也重定向到标准输出中,结合上一条就是把执行命令的输出都定向到 nohup_bluebell.log 文件
上面的命令执行后会返回进程 id
[1] 6338
当然我们也可以通过以下命令查看 bluebell 相关活动进程:
ps -ef | grep bluebell
输出:
root 6338 4048 0 08:43 pts/0 00:00:00 ./bin/bluebell conf/config.yaml
root 6376 4048 0 08:43 pts/0 00:00:00 grep --color=auto bluebell
此时就可以打开浏览器输入 http://服务器公网ip:端口 查看应用程序的展示效果了。
supervisor
Supervisor 是业界流行的一个通用的进程管理程序,它能将一个普通的命令行进程变为后台守护进程,并监控该进程的运行状态,当该进程异常退出时能将其自动重启。
首先使用 yum 来安装 supervisor:
如果你还没有安装过 EPEL,可以通过运行下面的命令来完成安装,如果已安装则跳过此步骤:
sudo yum install epel-release
安装 supervisor
sudo yum install supervisor
Supervisor 的配置文件为: /etc/supervisord.conf ,Supervisor 所管理的应用的配置文件放在 /etc/supervisord.d/ 目录中,这个目录可以在 supervisord.conf 中的 include 配置。
[include]
files = /etc/supervisord.d/*.conf
启动supervisor服务:
sudo supervisord -c /etc/supervisord.conf
我们在 /etc/supervisord.d 目录下创建一个名为 bluebell.conf 的配置文件,具体内容如下。
[program:bluebell] ;程序名称
user=root ;执行程序的用户
command=/data/app/bluebell/bin/bluebell /data/app/bluebell/conf/config.yaml ;执行的命令
directory=/data/app/bluebell/ ;命令执行的目录
stopsignal=TERM ;重启时发送的信号
autostart=true
autorestart=true ;是否自动重启
stdout_logfile=/var/log/bluebell-stdout.log ;标准输出日志位置
stderr_logfile=/var/log/bluebell-stderr.log ;标准错误日志位置
创建好配置文件之后,重启supervisor服务
sudo supervisorctl update # 更新配置文件并重启相关的程序
查看bluebell的运行状态:
sudo supervisorctl status bluebell
输出:
bluebell RUNNING pid 10918, uptime 0:05:46
最后补充一下常用的supervisr管理命令:
supervisorctl status  # 查看所有任务状态
supervisorctl shutdown  # 关闭所有任务
supervisorctl start 程序名 # 启动任务
supervisorctl stop 程序名 # 关闭任务
supervisorctl reload  # 重启supervisor
接下来就是打开浏览器查看网站是否正常了。
搭配nginx部署
在需要静态文件分离、需要配置多个域名及证书、需要自建负载均衡层等稍复杂的场景下,我们一般需要搭配第三方的web服务器(Nginx、Apache)来部署我们的程序。
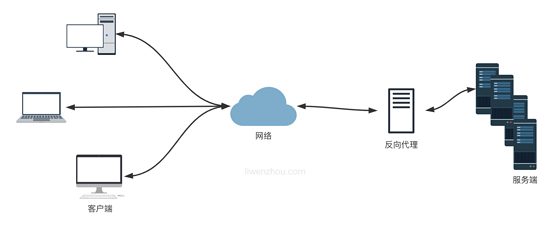
正向代理与反向代理
正向代理可以简单理解为客户端的代理,你访问墙外的网站用的那个属于正向代理。

反向代理可以简单理解为服务器的代理,通常说的 Nginx 和 Apache 就属于反向代理。
Nginx 是一个免费的、开源的、高性能的 HTTP 和反向代理服务,主要负责负载一些访问量比较大的站点。Nginx 可以作为一个独立的 Web 服务,也可以用来给 Apache 或是其他的 Web 服务做反向代理。相比于 Apache,Nginx 可以处理更多的并发连接,而且每个连接的内存占用的非常小。
使用yum安装nginx
EPEL 仓库中有 Nginx 的安装包。如果你还没有安装过 EPEL,可以通过运行下面的命令来完成安装:
sudo yum install epel-release
安装nginx
sudo yum install nginx
安装完成后,执行下面的命令设置Nginx开机启动:
sudo systemctl enable nginx
启动Nginx
sudo systemctl start nginx
查看Nginx运行状态:
sudo systemctl status nginx
Nginx配置文件
通过上面的方法安装的 nginx,所有相关的配置文件都在 /etc/nginx/ 目录中。Nginx 的主配置文件是 /etc/nginx/nginx.conf 。
默认还有一个 nginx.conf.default 的配置文件示例,可以作为参考。你可以为多个服务创建不同的配置文件(建议为每个服务(域名)创建一个单独的配置文件),每一个独立的 Nginx 服务配置文件都必须以 .conf 结尾,并存储在 /etc/nginx/conf.d 目录中。
Nginx常用命令
补充几个 Nginx 常用命令。
nginx -s stop # 停止 Nginx 服务
nginx -s reload # 重新加载配置文件
nginx -s quit # 平滑停止 Nginx 服务
nginx -t   # 测试配置文件是否正确
Nginx反向代理部署
我们推荐使用 nginx 作为反向代理来部署我们的程序,按下面的内容修改 nginx 的配置文件。
worker_processes 1;

events {
 worker_connections 1024;
}

http {
 include  mime.types;
 default_type application/octet-stream;

 sendfile  on;
 keepalive_timeout 65;

 server {
  listen  80;
  server_name localhost;

  access_log /var/log/bluebell-access.log;
  error_log /var/log/bluebell-error.log;

  location / {
   proxy_pass     http://127.0.0.1:8084;
   proxy_redirect    off;
   proxy_set_header   Host    $host;
   proxy_set_header   X-Real-IP  $remote_addr;
   proxy_set_header   X-Forwarded-For $proxy_add_x_forwarded_for;
  }
 }
}
执行下面的命令检查配置文件语法:
nginx -t
执行下面的命令重新加载配置文件:
nginx -s reload
接下来就是打开浏览器查看网站是否正常了。
当然我们还可以使用 nginx 的 upstream 配置来添加多个服务器地址实现负载均衡。
worker_processes 1;

events {
 worker_connections 1024;
}

http {
 include  mime.types;
 default_type application/octet-stream;

 sendfile  on;
 keepalive_timeout 65;

 upstream backend {
  server 127.0.0.1:8084;
  # 这里需要填真实可用的地址,默认轮询
  #server backend1.example.com;
  #server backend2.example.com;
 }

 server {
  listen  80;
  server_name localhost;

  access_log /var/log/bluebell-access.log;
  error_log /var/log/bluebell-error.log;

  location / {
   proxy_pass     http://backend/;
   proxy_redirect    off;
   proxy_set_header   Host    $host;
   proxy_set_header   X-Real-IP  $remote_addr;
   proxy_set_header   X-Forwarded-For $proxy_add_x_forwarded_for;
  }
 }
}
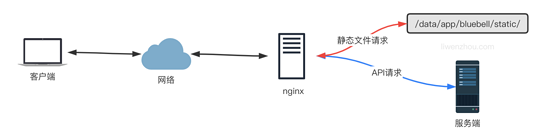
Nginx分离静态文件请求
上面的配置是简单的使用 nginx 作为反向代理处理所有的请求并转发给我们的 Go 程序处理,其实我们还可以有选择的将静态文件部分的请求直接使用 nginx 处理,而将 API 接口类的动态处理请求转发给后端的 Go 程序来处理。
下面继续修改我们的 nginx 的配置文件来实现上述功能。
worker_processes 1;

events {
 worker_connections 1024;
}

http {
 include  mime.types;
 default_type application/octet-stream;

 sendfile  on;
 keepalive_timeout 65;

 server {
  listen  80;
  server_name bluebell;

  access_log /var/log/bluebell-access.log;
  error_log /var/log/bluebell-error.log;

		# 静态文件请求
  location ~ .*\.(gif|jpg|jpeg|png|js|css|eot|ttf|woff|svg|otf)$ {
   access_log off;
   expires 1d;
   root  /data/app/bluebell;
  }

  # index.html页面请求
  # 因为是单页面应用这里使用 try_files 处理一下,避免刷新页面时出现404的问题
  location / {
   root /data/app/bluebell/templates;
   index index.html;
   try_files $uri $uri/ /index.html;
  }

		# API请求
  location /api {
   proxy_pass     http://127.0.0.1:8084;
   proxy_redirect    off;
   proxy_set_header   Host    $host;
   proxy_set_header   X-Real-IP  $remote_addr;
   proxy_set_header   X-Forwarded-For $proxy_add_x_forwarded_for;
  }
 }
}
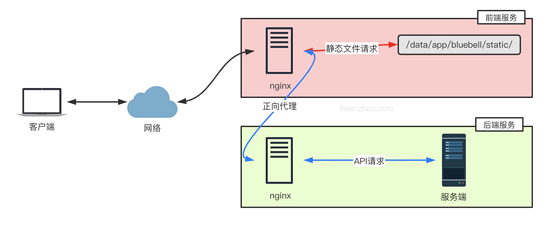
前后端分开部署
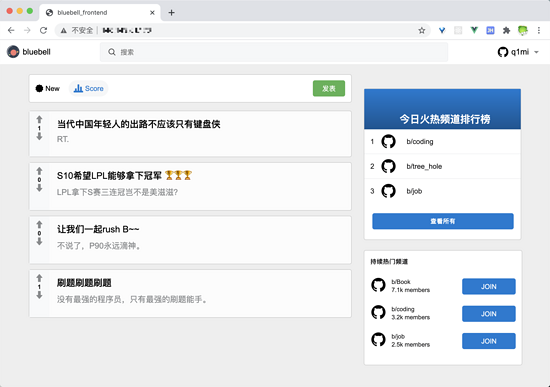
前后端的代码没必要都部署到相同的服务器上,也可以分开部署到不同的服务器上,下图是前端服务将API请求转发至后端服务的方案。
上面的部署方案中,所有浏览器的请求都是直接访问前端服务,而如果是浏览器直接访问后端API服务的部署模式下,如下图。
此时前端和后端通常不在同一个域下,我们还需要在后端代码中添加跨域支持。
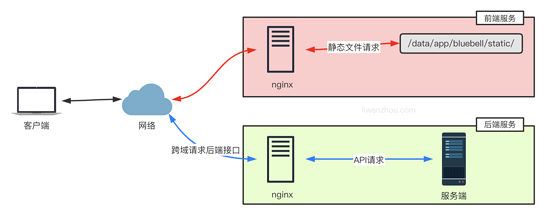
这里使用 github.com/gin-contrib/cors 库来支持跨域请求。
最简单的允许跨域的配置是使用 cors.Default() ,它默认允许所有跨域请求。
func main() {
	router := gin.Default()
	// same as
	// config := cors.DefaultConfig()
	// config.AllowAllOrigins = true
	// router.Use(cors.New(config))
	router.Use(cors.Default())
	router.Run()
}
此外,还可以使用 cors.Config 自定义具体的跨域请求相关配置项:
package main

import (
	"time"

	"github.com/gin-contrib/cors"
	"github.com/gin-gonic/gin"
)

func main() {
	router := gin.Default()
	// CORS for https://foo.com and https://github.com origins, allowing:
	// - PUT and PATCH methods
	// - Origin header
	// - Credentials share
	// - Preflight requests cached for 12 hours
	router.Use(cors.New(cors.Config{
		AllowOrigins:  []string{"https://foo.com"},
		AllowMethods:  []string{"PUT", "PATCH"},
		AllowHeaders:  []string{"Origin"},
		ExposeHeaders: []string{"Content-Length"},
		AllowCredentials: true,
		AllowOriginFunc: func(origin string) bool {
			return origin == "https://github.com"
		},
		MaxAge: 12 * time.Hour,
	}))
	router.Run()
}
容器部署
容器部署方案可参照我之前的博客: 使用Docker和Docker Compose部署Go Web应用 ,这里就不再赘述了。
到此这篇关于部署Go语言项目的 N 种方法(小结)的文章就介绍到这了,更多相关部署Go语言项目内容请搜索好代码网以前的文章或继续浏览下面的相关文章希望大家以后多多支持好代码网!