Hystrix监控
Hystrix除了实现容错之外,还提供了近乎实时的监控。Hystrix Command和HystrixObservableCommand在执行时,会会生成执行结果和运行指标,比如每秒的请求数和成功数等,这些监控数据对于分析系统请求的调用情况很有用。
我们以之前项目介绍过的micro-service-consumer-ribbon-hystrix为例,因为之前的项目中已经包含了spring-boot-starter-actuator和spring-cloud-starter-hystrix,因此可以直接通过http://localhost:7908/hystrix.stream来访问,但是页面展示的并不直观。
那么为什么之前介绍的micro-service-consumer-movie-feign-hystrix-fallback-factory打开http://localhost:8028/hystrix.stream却是404呢?因为在引入feign的时候带了hystrix,因此只需要再单独引入hystrix即可,同时还需要在启动类上加@EnableCircuitBreaker。
 <dependency>
            <groupId>org.springframework.cloud</groupId>
            <artifactId>spring-cloud-starter-hystrix</artifactId>
        </dependency>
使用Hystrix Dashboard 数据可视化监控面板
创建micro-service-hystrix-dashboard项目,首先来看一下这个项目的pom文件,我们引入了spring-cloud-starter-hystrix-dashboard的依赖:
<?xml version="1.0" encoding="UTF-8"?>
<project xmlns="http://maven.apache.org/POM/4.0.0"
         xmlns:xsi="http://www.w3.org/2001/XMLSchema-instance"
         xsi:schemaLocation="http://maven.apache.org/POM/4.0.0 http://maven.apache.org/xsd/maven-4.0.0.xsd">
    <modelVersion>4.0.0</modelVersion>
    <artifactId>micro-service-hystrix-dashboard</artifactId>
    <version>1.0-SNAPSHOT</version>
    <packaging>jar</packaging>
    <parent>
        <groupId>com.fanfan.cloud</groupId>
        <artifactId>micro-service-spring-cloud-study</artifactId>
        <version>0.0.1-SNAPSHOT</version>
    </parent>
    <dependencies>
        <dependency>
            <groupId>org.springframework.cloud</groupId>
            <artifactId>spring-cloud-starter-hystrix-dashboard</artifactId>
        </dependency>
    </dependencies>
    <!-- 引入spring cloud的依赖 -->
    <dependencyManagement>
        <dependencies>
            <dependency>
                <groupId>org.springframework.cloud</groupId>
                <artifactId>spring-cloud-dependencies</artifactId>
                <version>Edgware.SR6</version>
                <type>pom</type>
                <scope>import</scope>
            </dependency>
        </dependencies>
    </dependencyManagement>
    <build>
        <finalName>micro-service-hystrix-dashboard</finalName>
        <plugins>
            <plugin>
                <groupId>org.springframework.boot</groupId>
                <artifactId>spring-boot-maven-plugin</artifactId>
                <configuration>
                    <fork>true</fork>
                </configuration>
            </plugin>
        </plugins>
    </build>
</project>
接下来是编写启动类,在启动类上添加@EnableHystrixDashboard注解:
@SpringBootApplication
@EnableHystrixDashboard
public class HystrixDashboardApplication {
  public static void main(String[] args) {
    SpringApplication.run(HystrixDashboardApplication.class, args);
  }
}
application.yml的配置文件为:
server:
  port: 8030
由配置可知,我们并没有把HystrixDashboard注册到Eureka上。
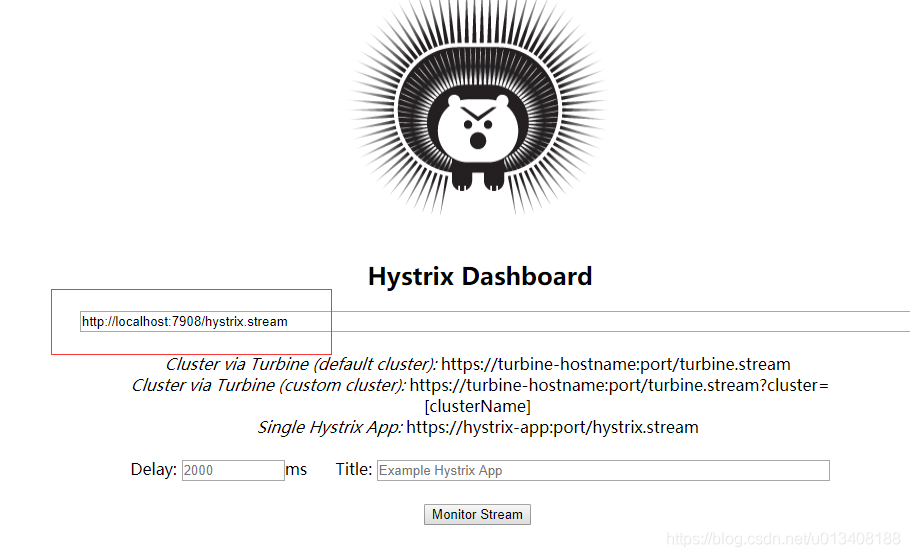
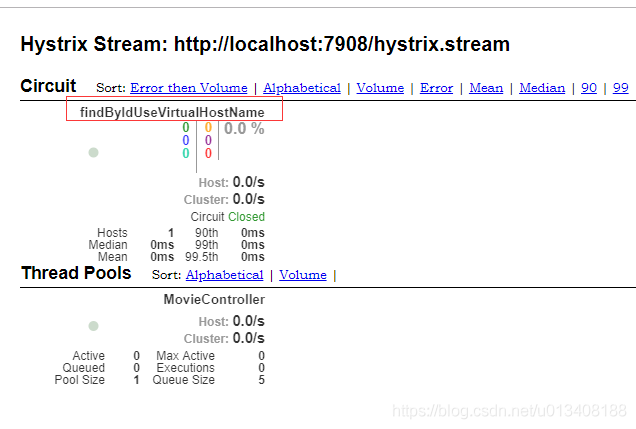
访问http://localhost:8030/hystrix,可看到如下的画面,输入http://localhost:8028/hystrix.stream地址查看监控数据。
我们也可以将dashboard注册到Eureka:
server:
  port: 8030
eureka:
  client:
    serviceUrl:
      defaultZone: http://localhost:8761/eureka/
  instance:
    prefer-ip-address: true
    instance-id: ${spring.application.name}:${spring.application.instance_id:${server.port}}
spring:
  application:
    name: hystrix-dashboard
使用Turbine聚合监控数据
上面我们使用/hystrix.stream端点监控单个微服务实例,然而微服务架构的应用系统一般会有若干个微服务,如果每次只能查看单个实例的监控数据,就要不停地切换Hystrix Dashboard的监控地址,非常不便,因此我们引入Hystrix监控数据聚合工具Turbine,它可以将所有相关的/hystrix.stream端点的数据聚合到一个组合的/turbine.stream中,从而使得集群监控更加方便。
创建一个项目micro-service-hystrix-turbine,需要引入spring-cloud-starter-turbine的依赖,如下所示:
<?xml version="1.0" encoding="UTF-8"?>
<project xmlns="http://maven.apache.org/POM/4.0.0"
         xmlns:xsi="http://www.w3.org/2001/XMLSchema-instance"
         xsi:schemaLocation="http://maven.apache.org/POM/4.0.0 http://maven.apache.org/xsd/maven-4.0.0.xsd">
    <!-- 引入spring boot的依赖 -->
    <modelVersion>4.0.0</modelVersion>
    <artifactId>micro-service-hystrix-turbine</artifactId>
    <version>1.0-SNAPSHOT</version>
    <packaging>jar</packaging>
    <parent>
        <groupId>com.fanfan.cloud</groupId>
        <artifactId>micro-service-spring-cloud-study</artifactId>
        <version>0.0.1-SNAPSHOT</version>
    </parent>
    <dependencies>
        <dependency>
            <groupId>org.springframework.cloud</groupId>
            <artifactId>spring-cloud-starter-turbine</artifactId>
        </dependency>
    </dependencies>
    <!-- 引入spring cloud的依赖 -->
    <dependencyManagement>
        <dependencies>
            <dependency>
                <groupId>org.springframework.cloud</groupId>
                <artifactId>spring-cloud-dependencies</artifactId>
                <version>Edgware.SR6</version>
                <type>pom</type>
                <scope>import</scope>
            </dependency>
        </dependencies>
    </dependencyManagement>
    <build>
        <finalName>micro-service-hystrix-turbine</finalName>
        <plugins>
            <plugin>
                <groupId>org.springframework.boot</groupId>
                <artifactId>spring-boot-maven-plugin</artifactId>
                <configuration>
                    <fork>true</fork>
                </configuration>
            </plugin>
        </plugins>
    </build>
</project>
在启动类上添加@EnableTurbine注解,如下所示:
@SpringBootApplication
@EnableTurbine
public class TurbineApplication {
  public static void main(String[] args) {
    SpringApplication.run(TurbineApplication.class, args);
  }
}
接下来是application.yml配置文件:
server:
port: 8031
spring:
application:
name: hystrix-turbine
eureka:
client:
serviceUrl:
defaultZone: http://discovery:8761/eureka/
instance:
prefer-ip-address: true
# 这里的名字是spring.application.name
turbine:
appConfig: cunsumer-ribbon-custom-hystrix,cunsumer-movie-feign-hystrix-fallback
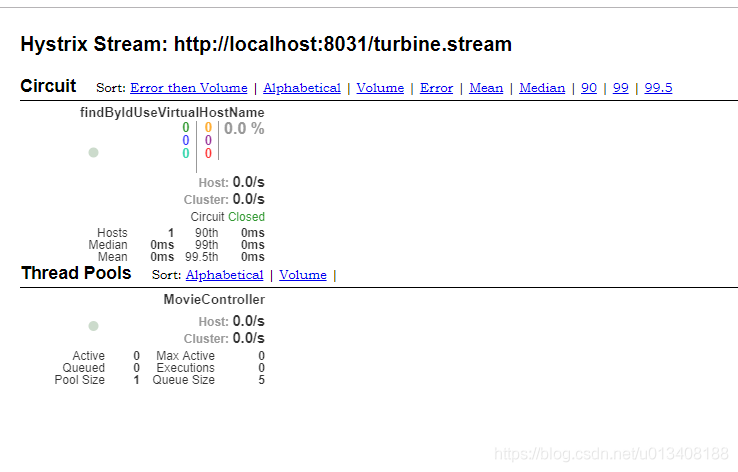
clusterNameExpression: "'default'"接下来我们分别启动micro-service-discovery-eureka、micro-service-provider-user、micro-service-consumer-ribbon-hystrix、micro-service-consumer-movie-feign-hystrix-fallback、micro-service-hystrix-dashboard、micro-service-hystrix-turbine,然后访问http://localhost:8030/hystrix, 输入http://localhost:8031/turbine.stream查看监控数据:
使用消息中间件收集数据
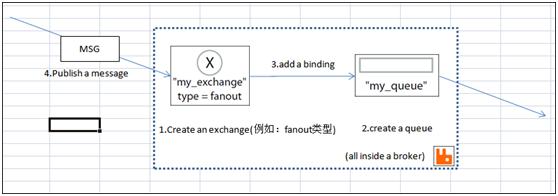
在微服务和Turbine网络不通的情况下,可借助消息中间件进行数据收集。
各个微服务将Hystrix Command的监控数据发送至消息中间件,Turbine去消费消息中间件的数据。
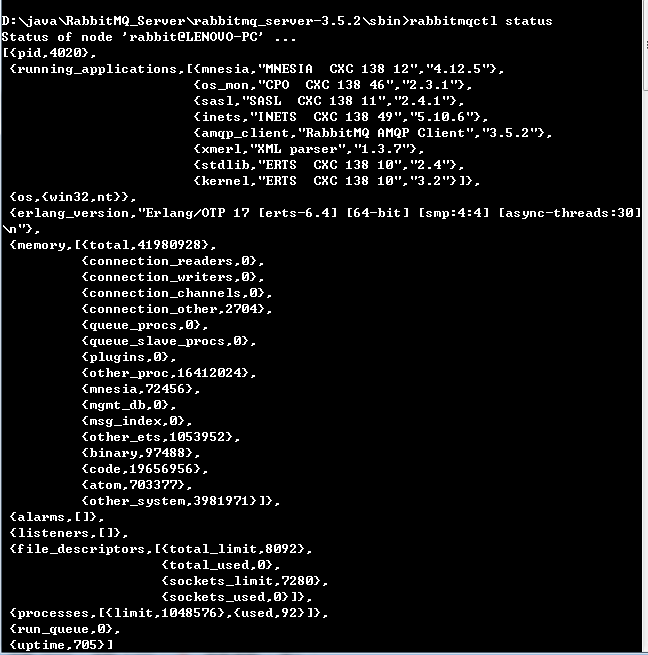
作者书上使用的消息队列使用RabbitMQ,需要安装并启动,先安装Erlang OTP。
安装完成后,在sbin目录下(或者将sbin目录配置到环境变量,然后执行 rabbitmq-plugins enable rabbitmq_management 启动服务

配置完成后,先执行stop再执行start。

启动后打开如下的页面:localhost:15672,用户名和密码都是guest。


项目中使用的是rabbitmq,要注意rabbitmq和activemq不可以同时开启。否则回报错。
com.rabbitmq.client.MalformedFrameException: AMQP protocol version mismatch; we are version 0-9-1, server sent signature 3,1,0,0
创建消息队列相关的项目
复制micro-service-consumer-ribbon-hystrix,修改为micro-service-consumer-ribbon-hystrix-turbine-mq项目,pom文件中引入spring-cloud-netflix-hystrix-stream和spring-cloud-starter-stream-rabbit的依赖,如下:
<?xml version="1.0" encoding="UTF-8"?>
<project xmlns="http://maven.apache.org/POM/4.0.0" xmlns:xsi="http://www.w3.org/2001/XMLSchema-instance"
	xsi:schemaLocation="http://maven.apache.org/POM/4.0.0 http://maven.apache.org/xsd/maven-4.0.0.xsd">
	<modelVersion>4.0.0</modelVersion>
	<artifactId>micro-service-consumer-ribbon-hystrix-turbine-mq</artifactId>
	<version>0.0.1-SNAPSHOT</version>
	<packaging>jar</packaging>
	<parent>
		<groupId>com.fanfan.cloud</groupId>
		<artifactId>micro-service-spring-cloud-study</artifactId>
		<version>0.0.1-SNAPSHOT</version>
	</parent>
	<properties>
		<project.build.sourceEncoding>UTF-8</project.build.sourceEncoding>
		<project.reporting.outputEncoding>UTF-8</project.reporting.outputEncoding>
		<java.version>1.8</java.version>
	</properties>
	<dependencies>
		<dependency>
			<groupId>org.springframework.boot</groupId>
			<artifactId>spring-boot-starter-web</artifactId>
		</dependency>
		<dependency>
			<groupId>org.springframework.boot</groupId>
			<artifactId>spring-boot-starter-test</artifactId>
			<scope>test</scope>
		</dependency>
		<dependency>
			<groupId>org.springframework.boot</groupId>
			<artifactId>spring-boot-starter-actuator</artifactId>
		</dependency>
		<dependency>
			<groupId>org.springframework.cloud</groupId>
			<artifactId>spring-cloud-starter-eureka</artifactId>
		</dependency>
		<dependency>
			<groupId>org.springframework.cloud</groupId>
			<artifactId>spring-cloud-starter-hystrix</artifactId>
		</dependency>
		<dependency>
			<groupId>org.springframework.cloud</groupId>
			<artifactId>spring-cloud-netflix-hystrix-stream</artifactId>
		</dependency>
        <dependency>
            <groupId>org.springframework.cloud</groupId>
            <artifactId>spring-cloud-starter-stream-rabbit</artifactId>
        </dependency>
	</dependencies>
	<!-- 引入spring cloud的依赖 -->
	<dependencyManagement>
		<dependencies>
			<dependency>
				<groupId>org.springframework.cloud</groupId>
				<artifactId>spring-cloud-dependencies</artifactId>
				<version>Edgware.SR6</version>
				<type>pom</type>
				<scope>import</scope>
			</dependency>
		</dependencies>
	</dependencyManagement>
	<build>
		<finalName>micro-service-consumer-ribbon-hystrix-turbine-mq</finalName>
		<plugins>
			<plugin>
				<groupId>org.springframework.boot</groupId>
				<artifactId>spring-boot-maven-plugin</artifactId>
			</plugin>
		</plugins>
	</build>
</project>
配置文件application.yml文件:
server:
  port: 7910
eureka:
  client:
    serviceUrl:
      defaultZone: http://localhost:8761/eureka/
  instance:
    prefer-ip-address: true
    instance-id: ${spring.application.name}:${spring.application.instance_id:${server.port}}
spring:
  application:
    name: cunsumer-ribbon-custom-hystrix
  rabbitmq:
    host: localhost
    port: 5672
    username: guest
    password: guest
以上监控数据发送到消息队列就修改完了。
然后我们创建项目micro-service-hystrix-turbine-mq,需要引入spring-cloud-starter-turbine-stream和spring-cloud-starter-stream-rabbit的依赖,pom文件为:
<?xml version="1.0" encoding="UTF-8"?>
<project xmlns="http://maven.apache.org/POM/4.0.0"
         xmlns:xsi="http://www.w3.org/2001/XMLSchema-instance"
         xsi:schemaLocation="http://maven.apache.org/POM/4.0.0 http://maven.apache.org/xsd/maven-4.0.0.xsd">
    <modelVersion>4.0.0</modelVersion>
    <artifactId>micro-service-hystrix-turbine-mq</artifactId>
    <version>1.0-SNAPSHOT</version>
    <packaging>jar</packaging>
    <parent>
        <groupId>com.fanfan.cloud</groupId>
        <artifactId>micro-service-spring-cloud-study</artifactId>
        <version>0.0.1-SNAPSHOT</version>
    </parent>
    <dependencies>
        <dependency>
            <groupId>org.springframework.cloud</groupId>
            <artifactId>spring-cloud-starter-turbine-stream</artifactId>
        </dependency>
        <dependency>
            <groupId>org.springframework.cloud</groupId>
            <artifactId>spring-cloud-starter-stream-rabbit</artifactId>
        </dependency>
    </dependencies>
    <build>
        <finalName>micro-service-hystrix-turbine-mq</finalName>
        <plugins>
            <plugin>
                <groupId>org.springframework.boot</groupId>
                <artifactId>spring-boot-maven-plugin</artifactId>
                <configuration>
                    <fork>true</fork>
                </configuration>
            </plugin>
        </plugins>
    </build>
</project>
将@EnableTurbine修改为@EnableTurbineStream,修改配置文件application.yml文件:
server:
  port: 8032
spring:
  application:
    name: robot-hystrix-turbine-mq
  rabbitmq:
    host: localhost
    port: 5672
    username: guest
    password: guest
eureka:
  client:
    serviceUrl:
      defaultZone: http://discovery:8761/eureka/
  instance:
    prefer-ip-address: true
总结
以上为个人经验,希望能给大家一个参考,也希望大家多多支持好代码网。