SpringBoot整合RabbitMQ
1 生产者SpringBootProducer
1 1 创建工程并导入依赖
我们使用的springboot版本为2 5
SpringBoot整合RabbitMQ
1.生产者SpringBootProducer
1.1 创建工程并导入依赖
我们使用的springboot版本为2.5.6,其他都是根据spring-boot-starter-parent自动选择版本
引入以下工程即可
spring-boot-starter-test用于测试junit用于单元测试spring-boot-starter-amqpSpringBoot和RabbitMQ的整合方案
<?xml version="1.0" encoding="UTF-8"?>
<project xmlns="http://maven.apache.org/POM/4.0.0"
         xmlns:xsi="http://www.w3.org/2001/XMLSchema-instance"
         xsi:schemaLocation="http://maven.apache.org/POM/4.0.0 http://maven.apache.org/xsd/maven-4.0.0.xsd">
    <modelVersion>4.0.0</modelVersion>
    <parent>
        <groupId>org.springframework.boot</groupId>
        <artifactId>spring-boot-starter-parent</artifactId>
        <version>2.5.6</version>
        <relativePath/>
    </parent>
    <artifactId>springboot-producer</artifactId>
    <version>1.0-SNAPSHOT</version>
    <properties>
        <maven.compiler.source>8</maven.compiler.source>
        <maven.compiler.target>8</maven.compiler.target>
        <project.build.sourceEncoding>UTF-8</project.build.sourceEncoding>
    </properties>
    <dependencies>
        <dependency>
            <groupId>org.springframework.boot</groupId>
            <artifactId>spring-boot-starter-test</artifactId>
            <scope>test</scope>
        </dependency>
        <dependency>
            <groupId>org.springframework.boot</groupId>
            <artifactId>spring-boot-starter-amqp</artifactId>
        </dependency>
        <dependency>
            <groupId>junit</groupId>
            <artifactId>junit</artifactId>
            <scope>test</scope>
        </dependency>
    </dependencies>
</project>
1.2 创建配置文件并配置
SpringBoot配置文件名称为application.yml
需要配置的内容如下:
# 配置RabbitMQ的基本信息
spring:
  rabbitmq:
    # 地址
    host: 192.168.52.128
    # 端口
    port: 5672
    # 用户名
    username: admin
    # 密码
    password: admin
    # 虚拟机
    virtual-host: /test
1.3 创建项目启动类
@SpringBootApplication
public class ProducerApplication {
    public static void main(String[] args) {
        SpringApplication.run(ProducerApplication.class, args);
    }
}
1.4 创建RabbitMQ配置类
@Configuration
public class RabbitMQConfig {
	// 配置代码都写在这里
}
(1)设置默认的交换机的名称和队列名称
/**
 * 默认测试的交换机机名称
 * springboot_topic_exchange
 */
public static final String EXCHANGE_NAME = "springboot_topic_exchange";
/**
 * 默认的队列名称
 * springboot_root_queue
 */
public static final String QUEUE_NAME = "springboot_root_queue";
(2)创建通配符类型的交换机
/**
 * 创建交换机
 *
 * @return 交换机
 */
@Bean("bootExchange")
public Exchange bootExchange() {
    // 创建一个通配符的交换机
    return ExchangeBuilder.topicExchange(EXCHANGE_NAME).durable(true).build();
}
这里需要在bean上加上名称(虽然如果没有时会使用方法名,但是严谨),便于之后交换机和队列绑定操作。
除了通配符交换机外,还支持
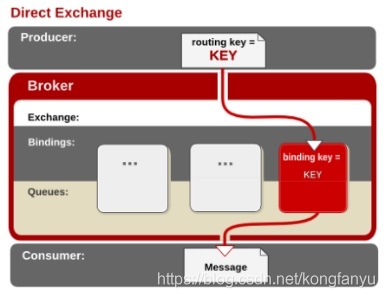
广播型交换机、定向型交换机。
- 广播型交换机
/**
 * 创建交换机
 *
 * @return 交换机
 */
@Bean("bootExchange")
public Exchange bootExchange() {
    // 创建一个通配符的交换机
    return ExchangeBuilder.topicExchange(EXCHANGE_NAME).durable(true).build();
}- 定向型交换机
@Bean("directExchange")
public Exchange directExchange() {
    return ExchangeBuilder.directExchange("direct_exchange").durable(true).build();
}
(3)创建一个队列
/**
 * 创建队列
 *
 * @return 队列
 */
@Bean("bootQueue")
public Queue bootQueue() {
    return QueueBuilder.durable(QUEUE_NAME).build();
}
(4)绑定交换机和队列
/**
 * 绑定队列和交换机
 * 主要:队列、交换机、routing key
 *
 * @return 绑定关系
 */
@Bean
public Binding bindingQueueExchange(@Qualifier("bootQueue") Queue queue, @Qualifier("bootExchange") Exchange exchange) {
    return BindingBuilder.bind(queue).to(exchange).with("boot.#").noargs();
}
(5)完整配置类
@Configuration
public class RabbitMQConfig {
    /**
     * 默认测试的交换机机名称
     * springboot_topic_exchange
     */
    public static final String EXCHANGE_NAME = "springboot_topic_exchange";
    /**
     * 默认的队列名称
     * springboot_root_queue
     */
    public static final String QUEUE_NAME = "springboot_root_queue";
    /**
     * 创建交换机
     *
     * @return 交换机
     */
    @Bean("bootExchange")
    public Exchange bootExchange() {
        // 创建一个通配符的交换机
        return ExchangeBuilder.topicExchange(EXCHANGE_NAME).durable(true).build();
    }
    /**
     * 创建队列
     *
     * @return 队列
     */
    @Bean("bootQueue")
    public Queue bootQueue() {
        return QueueBuilder.durable(QUEUE_NAME).build();
    }
    /**
     * 绑定队列和交换机
     * 主要:队列、交换机、routing key
     *
     * @return 绑定关系
     */
    @Bean
    public Binding bindingQueueExchange(@Qualifier("bootQueue") Queue queue, @Qualifier("bootExchange") Exchange exchange) {
        return BindingBuilder.bind(queue).to(exchange).with("boot.#").noargs();
    }
}
1.5 测试发送消息
@SpringBootTest
@RunWith(SpringRunner.class)
public class ProducerTest {
    @Autowired
    private RabbitTemplate rabbitTemplate;
    @Test
    public void testSend() {
        rabbitTemplate.convertAndSend(RabbitMQConfig.EXCHANGE_NAME, "boot.name", "Spring Boot RabbitMQ");
    }
}
2.消费者SpringBootConsumer
2.1 创建工程并导入依赖
<?xml version="1.0" encoding="UTF-8"?>
<project xmlns="http://maven.apache.org/POM/4.0.0" xmlns:xsi="http://www.w3.org/2001/XMLSchema-instance"
         xsi:schemaLocation="http://maven.apache.org/POM/4.0.0 https://maven.apache.org/xsd/maven-4.0.0.xsd">
    <modelVersion>4.0.0</modelVersion>
    <parent>
        <groupId>org.springframework.boot</groupId>
        <artifactId>spring-boot-starter-parent</artifactId>
        <version>2.5.6</version>
        <relativePath/> <!-- lookup parent from repository -->
    </parent>
    <groupId>com.example</groupId>
    <artifactId>springboot-consumer</artifactId>
    <version>0.0.1-SNAPSHOT</version>
    <name>springboot-consumer</name>
    <description>springboot-consumer</description>
    <properties>
        <java.version>1.8</java.version>
    </properties>
    <dependencies>
        <dependency>
            <groupId>org.springframework.boot</groupId>
            <artifactId>spring-boot-starter-amqp</artifactId>
        </dependency>
        <dependency>
            <groupId>org.springframework.boot</groupId>
            <artifactId>spring-boot-starter-test</artifactId>
            <scope>test</scope>
        </dependency>
        <dependency>
            <groupId>org.springframework.amqp</groupId>
            <artifactId>spring-rabbit-test</artifactId>
            <scope>test</scope>
        </dependency>
    </dependencies>
    <build>
        <plugins>
            <plugin>
                <groupId>org.springframework.boot</groupId>
                <artifactId>spring-boot-maven-plugin</artifactId>
            </plugin>
        </plugins>
    </build>
</project>
PS:以上依赖是由springboot工程创建完成,和之前手动创建没有本质差别
2.2 创建配置文件并配置
SpringBoot配置文件名称为application.yml
需要配置的内容如下:
# 配置RabbitMQ的基本信息
spring:
  rabbitmq:
    # 地址
    host: 192.168.52.128
    # 端口
    port: 5672
    # 用户名
    username: admin
    # 密码
    password: admin
    # 虚拟机
    virtual-host: /test
2.3 创建项目启动类
@SpringBootApplication
public class ConsumerApplication {
    public static void main(String[] args) {
        SpringApplication.run(ConsumerApplication.class, args);
    }
}
2.3 创建监听器
@Component
public class RabbitMQListener {
    @RabbitListener(queues = "springboot_root_queue")
    public void listenerQueue(Message message) {
        System.out.println("RabbitMQListener:" + new String(message.getBody()));
    }
}
@RabbitListener表示当前方法监听对应的队列,并且支持多队列。
2.4 run
控制台如下:
RabbitMQListener:Spring Boot RabbitMQ
到此这篇关于SpringBoot整合RabbitMQ示例详解的文章就介绍到这了,更多相关SpringBoot整合RabbitMQ内容请搜索好代码网以前的文章或继续浏览下面的相关文章希望大家以后多多支持好代码网!