前言
vue2 截止 2023 年 12 月 31 日不再维护更新,将全面拥抱 vue3 了。
vue2
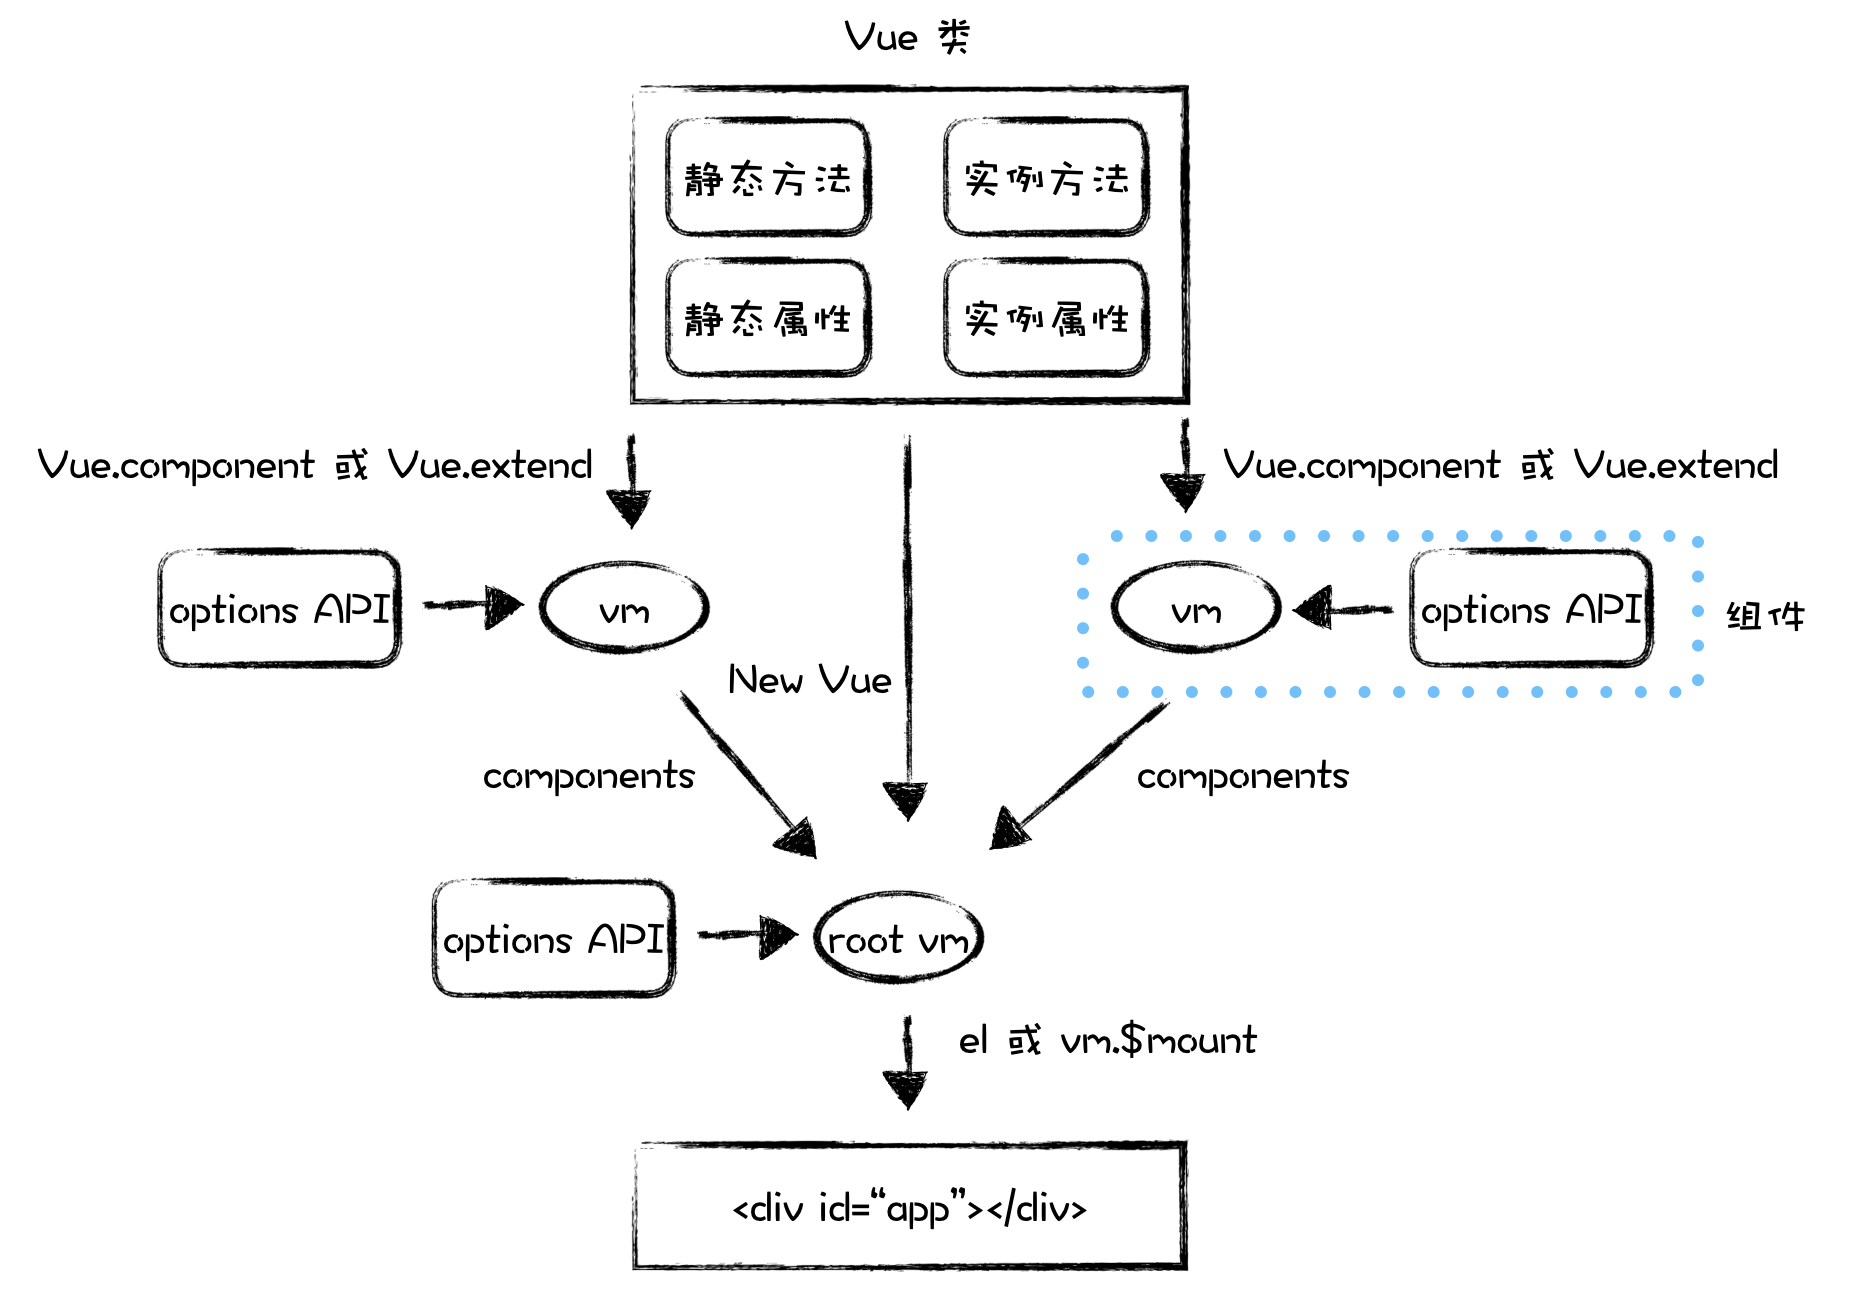
vue2 是一个实现 UI 层的渐进式 js 框架。vue2 本质是一个类,可以配置 options API 实例化为一个 vm 对象,通过模板编译处理成虚拟 DOM,对比更新后生成真实 DOM 并挂载至页面中,实现页面渲染,相较于原生 js 更加易用,灵活,高效。
简而言之,vue2 的实例对象就是一种特殊的 DOM,可以通过 Options API 配置化生成 DOM,vue2 也提供一系列的方法(静态方法和实例方法)和属性(静态属性和实例属性)来支持操作 DOM。这个 DOM 支持更小粒度的拆分和组合,这种小粒度的 DOM 称之为组件,而组件也是 vue2 的实例对象。

注意:vue2 中实例化 vm 对象的方式有:new Vue(), Vue.component(), Vue.extend() 三种方式,vm 对象可以称为组件。组件本质是特殊的 DOM,多个组件串联就构成 DOM 树,经过浏览器渲染就生成了页面。
Options API
Options API 是 vue 的配置选项,用户可以通过指定配置,实例化自定义的 vm 对象,可以具备数据,DOM元素,交互方法等。
DOM Options
DOM Options 主要包含 el, template, render, renderError 四个选项。
-
el
el是 vue 实例 vm 对象关联 HTML 文档的唯一配置项,可以通过配置el选项指定 vm 对象挂载 DOM 位置。<div id="app"></div> <script type="text/javascript"> const vm = new Vue({ el: '#app', template: `<h1>template</h1>`, }) </script>vm 对象也可以通过实例方法
vm.$mount()挂载指定 DOM。<div id="app"></div> <script type="text/javascript"> const vm = new Vue({ template: `<h1>template</h1>`, }) vm.$mount('#app') </script>注意:
el选项只在new Vue()实例化过程生效,Vue.component()和Vue.extend()两种方式实例化的 vm 对象需要通过components方式挂载至 new Vue() 实例化对象上,如此构成一个new Vue()实例化根节点,Vue.component()和Vue.extend()实例化子节点的 DOM 树。 -
template
template用于指定当前 vm 对象渲染在页面中的 DOM 元素,当el选项生效时,可以省略,则挂载 DOM 即渲染 DOM。<div id="app"></div> <script type="text/javascript"> const vm = new Vue({ el: '#app', template: `<h1>template</h1>`, }) </script>上述方式,
template使用内嵌 HTML 的方式,也可以将模板外化。<div id="app"></div> <template id="templ"> <div> <h1>template</h1> </div> </template> <script type="text/javascript"> const vm = new Vue({ el: '#app', template: '#templ' }) </script> -
render
render优先级最高,一旦重写render方法,优先使用render函数返回的 DOM 元素。<div id="app"></div> <script type="text/javascript"> const vm = new Vue({ template: `<h1>template</h1>`, render(createElement) { return createElement( 'div', { attrs: { id: 'test' } }, [ 'render', createElement( 'a', { attrs: { href: 'www.baidu.com' } }, [ '百度' ] ) ] ) } }) vm.$mount('#app') </script>render方法参数 createElement 是一个函数,接收三个参数:标签名,属性对象,子元素数组,返回由参数生成的 DOM 元素。详细使用可以参考 渲染函数。vue2 源码中关于 render, template, el 调用顺序 的源码描述
if (!options.render) { // render 不存在 let template = options.template if (template) { // template 存在 if (typeof template === 'string') { if (template.charAt(0) === '#') { // template: '#templ' template = idToTemplate(template) // 使用外化模板 } else if (template.nodeType) { // template: '<div></div>' template = template.innerHTML // template 使用内嵌HTML,且是 dom 元素时,直接取内容作为模板 } else { // template 是组件 return this } } else if (el) { template = getOuterHTML(el) // render, template 不存在,使用 el.outerHTML } if (template) { const { render, staticRenderFns } = compileToFunctions( // compileToFunctions: template 模板解析生成 render 函数 template, { outputSourceRange: __DEV__, shouldDecodeNewlines, shouldDecodeNewlinesForHref, delimiters: options.delimiters, comments: options.comments }, this ) options.render = render // 生成 render 函数添加至 vm.$options.render options.staticRenderFns = staticRenderFns } } -
renderError
renderError是 render 函数的异常处理函数,接收两个参数:createElement 和 err,其中 error 是 render 函数抛出的异常。<div id="app"></div> <script type="text/javascript"> const vm = new Vue({ template: `<h1>template</h1>`, render(createElement) { throw new Error('render error') }, renderError(createElement, err) { if(err) { return createElement('div', {}, 'render error') } } }) vm.$mount('#app') </script>
Data Options
-
data
data用于配置 vm 对象中的数据,数据是 data 属性的方式添加至 vm 对象中,这些数据是当前 vm 对象的自身数据,其他对象无法获取。data的使用有两种方式:object 形式 和 function 形式object 形式:
<div id="app">{{ msg }}</div>

<script type="text/javascript">
    const vm = new Vue({
        el: '#app',
        data: {
            msg: 'ming'
        }
    })
</script>
function 形式:
<div id="app">{{ msg }}</div>

<script type="text/javascript">
    const vm = new Vue({
        el: '#app',
        data() {
            return {
                msg: 'ming'
            }
        }
    })
</script>
实际开发过程中,推荐使用 function 形式,主要原因:每次实例化 vm 对象时,data 函数利用其作用域的特点,执行并返回一个新的 data 对象,保证数据的独立性。而 object 形式,多个实例共用同一个 data 对象,对象为引用类型数据,一旦任一实例修改data对象中的属性,则其他实例数据也会发生修改。
<div id="app1">{{ arr }}</div> <div id="app2">{{ arr }}</div> <script type="text/javascript"> // object 形式 const exampleData = { arr: [1,2,3] } // 1s 后页面显示:[1,2,3,4], [1,2,3,4] // function 形式 // const exampleData = () => ({ arr: [1,2,3] }) // 1s 后页面显示:[1,2,3,4], [1,2,3] const vm1 = new Vue({ el: '#app1', data: exampleData }) const vm2 = new Vue({ el: '#app2', data: exampleData }) setTimeout(() => { vm1.arr.push(4) }, 1000) </script> -
props
props用于配置 vm 对象之间传递的数据,vm 对象之间相互关联成 tree 结构,因此存在父子关系,兄弟关系等多种树结构关系,父 -> 子的数据传递就需要通过props属性传递。<div id="app"> <parent></parent> </div> <script type="text/javascript"> Vue.component('child', { // Vue.component 创建组件 template: ` <div> <p>this is child</p> <p>parent: {{ message }}</p> </div> `, props: [ 'message' ] // 数组方式接收父组件传递的数据 }) Vue.component('parent', { template: ` <div> <p>this is parent</p> <child :message="msg"></child> </div> `, data() { return { msg: 'parent->child' } } }) const vm = new Vue({ el: '#app' // new Vue() 实例化的组件(vm) 只作为树的根节点,因此不会使用 props 属性。 }) </script>props接收父组件传递数据有两种接收方式:array 方式和 object 方式。array 方式:
Vue.component('child', {
    ...
    props: [ 'data1', 'data2', ... ], // 接受多个数据
})
object 方式
Vue.component('child', {
    ...
    props: {
        data1: {
            type: String, // 接受数据类型,可以为:String, Number, Boolean, Array, Object, Date, Function, 自定义构造函数等
            default: '', // 接受数据默认值,props.data1 未传入,则使用该值
            required: true, // 接受数据是否必传
            validator: function(value) { // 接收数据校验
                return value > 0
            }
        },
        data2: {
            ...
        }
    }, // 接受多个数据
})
注意:object 方式增加了父组件传递数据的默认值和校验,可以缺省。当数据 type 为 Object 时,default 应以:() => ({}) 设置,保证对象的唯一性。
-
propsData
按照官网例子,发现注册组件,并在模板中使用,会调用两次组件实例化,第一次可以获取
propsData传入值,第二次获取为 undefined,不会渲染在页面中。暂未研究明白这个属性有什么作用,有待研究。<div id="app"></div> <script type="text/javascript"> var Comp = Vue.extend({ props: ['msg'], template: '<div>{{ msg }}</div>', created() { console.log('this', this.msg) } }) new Comp({ propsData: { msg: 'hello' } }) Vue.component('test-comp', Comp) const vm = new Vue({ el: '#app', template: '<test-comp></test-comp>' }) </script> -
computed
computed用于设置计算数据属性,是对data数据的增加补充。computed的数据属性设置有:function 方式和 object 方式。function 方式
const vm = new Vue({
    el: '#app',
    data() {
        return {
            name: 'ming',
        }
    },
    computed: {
        fullName() {
            return `huang${this.name}` // 只能读取
        }
    }
})
object 方式
const vm = new Vue({
    el: '#app',
    data() {
        return {
            name: 'ming',
        }
    },
    computed: {
        fullName: {
            get() {
                return `huang${this.name}` // 可以读取
            },
            set(val) {
                this.name = val // 可以写入
            }
        }
    }
})
注意:
computed是data的计算数据属性,依赖于data属性存在,读取和写入均为计算后的data数据属性,又与data具有相同使用效果,可以在template或methods中调用。computed具有缓存。当computed依赖的data属性未发生修改时,多次调用computed属性,其取值函数只执行一次。 -
methods
methods用于配置 vm 对象中交互方法,属性设置为 function 方式。const vm = new Vue({ el: '#app', data() { return { name: 'ming', } }, methods: { handleClick() { // 鼠标点击交互 }, handleDeal() { // 数据处理 }, async fetchListById() { // 请求处理 } } })注意:调用
methods中方法多以this.handleClick方式,而非this.methods.handleClick方式,是内部进行了处理,将方法挂载 vm 上。function noop(a?: any, b?: any, c?: any) {} function bind(fn: Function, ctx: Object): Function { return fn.bind(ctx) } function initMethods(vm: Component, methods: Object) { const props = vm.$options.props for (const key in methods) { vm[key] = typeof methods[key] !== 'function' ? noop : bind(methods[key], vm) } } -
watch
watch用于监控数据修改,其属性即为所监控的数据,当数据修改会执行相应的处理方法。watch的使用有多种方式,包括 string 方式,function 方式, array 方式和 object 方式。string 方式
const vm = new Vue({
    el: '#app',
    data() {
        return {
            name: 'ming',
        }
    },
    watch: {
        name: 'handleNameChange'
    },
    methods: {
        handleNameChange() {
            console.log('name change') // 1s 后 name change
        }
    }
})

setTimeout(() => {
    vm.name = 'hua'
},1000)
function 方式
const vm = new Vue({
    el: '#app',
    data() {
        return {
            name: 'ming',
        }
    },
    watch: {
        name() {
            console.log('name change') // 1s 后 name change
        }
    },
})

setTimeout(() => {
    vm.name = 'hua'
},1000)
array 方式
const vm = new Vue({
    el: '#app',
    data() {
        return {
            name: 'ming',
        }
    },
    watch: {
        name: [
            function() { console.log('name change 1') }, // 1s 后 name change 1
            function() { console.log('name change 2') }, // 1s 后 name change 2
        ]
    },
})

setTimeout(() => {
    vm.name = 'hua'
},1000)
object 方式
deep 属性:深度监听多层嵌套对象类型数据的属性变化。
const vm = new Vue({
    el: '#app',
    data() {
        return {
            person: {
                name: 'ming',
                age: 18,
                obj: {
                    a: {
                        data: 1
                    }
                }
            }
        }
    },
    watch: {
        person: {
            handler() {
                console.log('name change') // 1s 后 name change
            },
            deep: true, // 深度监听对象,对象属性为对象时,设置 true 可以检测内部深层对象属性的修改
        }
    }
})

setTimeout(() => {
    vm.person.obj.a.data = 2
},1000)
immediate 属性:立即执行属性,数据监听初始立即执行 watch 的处理函数,属性修改会再次执行
const vm = new Vue({
    el: '#app',
    data() {
        return {
            name: 'ming',
        }
    },
    watch: {
        name: {
            handler() {
                console.log('name change') // 执行后 name change,1s 后再次 name change
            },
            immediate: true, // 初始化后立即调用 handler
        }
    }
})

setTimeout(() => {
    vm.name = 'hua'
},1000)
注意:watch 可以监听 data 数据是否发生修改,做相应的操作,同样也可以监听路由发生修改,执行相应的操作。
...
data() {
   ...
},
watch: {
   $route(to, from) {
       // to 跳转至页面,from 来源页面
   }
}
...
LifeCycle Options
-
beforeCreate
beforeCreatevue 实例创建完成之后,状态初始化完成之前执行,完整生命周期内只调用一次,调用过程中可以通过 this 访问 vue 实例,无法访问 data,computed,methods 等状态和方法。new Vue({ data() { return { ... } }, beforeCreate() { // this 即 vm,可以进行 vm 实例相关操作 } }) -
created
created状态初始化完成之后执行,完整生命周期内只调用一次,调用过程中可以访问 data,computed,methods 等状态和方法。new Vue({ data() { return { ... } }, created() { // 可以进行数据操作或者异步请求操作 } }) -
beforeMount
beforeMount模板编译完成之后,生成真实 DOM 节点之前执行,即未完成挂载。完整生命周期内只调用一次,调用过程中无法访问真实 DOM 元素。new Vue({ data() { return { ... } }, beforeMount() { // 可以进行数据操作 } }) -
mounted
mountedDOM 挂载之后执行,完整生命周期内只调用一次,调用过程中可以访问真实 DOM 元素。vue 中 DOM 更新挂载是异步的,而
mounted是在 DOM 挂载之后执行,并不是 DOM 挂载完成之后执行。因此,mounted中无法获取完成 DOM 元素,需要借助nextTick获取。new Vue({ data() { return { ... } }, mounted() { // 可以进行数据操作,异步请求操作 this.$nextTick(() => { // 或者 DOM 操作 }) } })注意:
created和mounted都可以进行异步请求操作,实际工作中,异步请求操作在哪个钩子中调用根据个人习惯而定,created比mounted先调用理论,时间差太小,优化微不足道,不必纠结于此。 -
beforeUpdate
beforeUpdate数据和 DOM 更新之前执行,完整生命周期内会调用多次,调用过程中可以获取更新前的数据和 DOM 元素。new Vue({ data() { return { ... } }, beforeUpdate() { // 可以进行数据操作和 DOM 操作 } }) -
updated
updated数据和 DOM 更新之后执行,完整生命周期内会调用多次,调用过程中可以获取更新后的数据和 DOM 元素。new Vue({ data() { return { ... } }, updated() { // 不推荐进行数据操作和 DOM 操作,避免无限循环。 } }) -
beforeDestroy
beforeDestroy实例销毁之前,数据观测和事件监听取消之后执行,完整生命周期内只调用一次,调用过程中可以进行一些清理操作。new Vue({ data() { return { ... } }, beforeDestroy() { // 可以进行清理操作,如清除定时器,取消异步请求等 } }) -
destroyed
destroyed实例销毁之后执行,完整生命周期内只调用一次,调用过程中也可以进行一些清理操作,无法访问 DOM 元素。A,B组件切换时,A 组件的
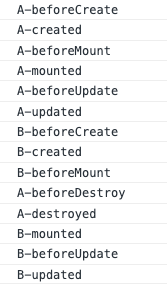
beforeDestroy和destroyed触发是在 B 组件的beforeMount之后,mounted之前。new Vue({ data() { return { ... } }, destroyed() { // 可以进行清理操作,如清除定时器,取消异步请求等 } }) -
activated
activated在组件被<keep-alive>组件包裹以后激活该钩子函数,组件被激活(显示)时调用,类似于组件中created和beforeMount钩子函数。<keep-alive>组件包裹以后,activated触发是在mounted之后触发。new Vue({ data() { return { ... } }, activated() { // 进行数据操作和异步请求操作 } }) -
deactivated
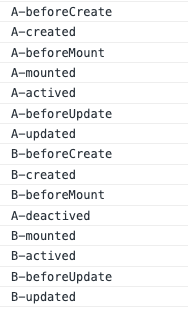
deactivated同样在组件被<keep-alive>组件包裹以后激活该钩子函数,组件被停用(隐藏)时调用,类似于组件中beforeDestroy和destroyed钩子函数。<keep-alive>组件包裹以后,beforeDestroy和destroyed会被deactivated取代触发。同样,A,B组件切换时,A 组件的deactivated触发是在 B 组件的beforeMount之后,mounted之前。new Vue({ data() { return { ... } }, deactivated() { // 可以进行清理操作,如清除定时器,取消异步请求等 } })A,B 组件切换生命周期的执行顺序:
组件缓存时,即 keep-alive 包裹。
<div id="app">
    <button @click="handleChange">切换组件</button>
    <keep-alive>
        <component :is="componentName">触发更新</component>
    </keep-alive>
</div>

<script type="text/javascript">

Vue.component('aComp', {
    template: `
        <div>
            <h1>{{ name }}</h1>
            <button @click="handleClick">A-触发更新</button>
        </div>
    `,
    data() {
        return {
            name: 'AComp'
        }
    },
    methods: {
        handleClick() {
            this.name = 'A'
        }
    },
    beforeCreate() {
        console.log('A-beforeCreate')
    },
    created() {
        console.log('A-created')
    },
    beforeMount() {
        console.log('A-beforeMount')
    },
    mounted() {
        console.log('A-mounted')
    },
    beforeUpdate() {
        console.log('A-beforeUpdate')
    },
    updated() {
        console.log('A-updated')
    },
    beforeDestroy() {
        console.log('A-beforeDestroy')
    },
    destroyed() {
        console.log('A-destroyed')
    },
    activated() {
        console.log('A-actived')
    },
    deactivated() {
        console.log('A-deactived')
    },
})

Vue.component('bComp', {
    template: `
        <div>
            <h1>{{ name }}</h1>
            <button @click="handleClick">B-触发更新</button>
        </div>
    `,
    data() {
        return {
            name: 'BComp'
        }
    },
    methods: {
        handleClick() {
            this.name = 'B'
        }
    },
    beforeCreate() {
        console.log('B-beforeCreate')
    },
    created() {
        console.log('B-created')
    },
    beforeMount() {
        console.log('B-beforeMount')
    },
    mounted() {
        console.log('B-mounted')
    },
    beforeUpdate() {
        console.log('B-beforeUpdate')
    },
    updated() {
        console.log('B-updated')
    },
    beforeDestroy() {
        console.log('B-beforeDestroy')
    },
    destroyed() {
        console.log('B-destroyed')
    },
    activated() {
        console.log('B-actived')
    },
    deactivated() {
        console.log('B-deactived')
    },
})

const vm = new Vue({
    el: '#app',
    data() {
        return {
            componentName: 'aComp'
        }
    },
    methods: {
        handleChange() {
            if(this.componentName === 'aComp') {
                this.componentName = 'bComp'
            } else {
                this.componentName = 'aComp'
            }
        }
    }
})

</script>
组件不缓存时,无 keep-alive 包裹。
<div id="app">
    <button @click="handleChange">切换组件</button>
    <component :is="componentName">触发更新</component>
</div>

<script type="text/javascript">

Vue.component('aComp', {
    template: `
        <div>
            <h1>{{ name }}</h1>
            <button @click="handleClick">A-触发更新</button>
        </div>
    `,
    data() {
        return {
            name: 'AComp'
        }
    },
    methods: {
        handleClick() {
            this.name = 'A'
        }
    },
    beforeCreate() {
        console.log('A-beforeCreate')
    },
    created() {
        console.log('A-created')
    },
    beforeMount() {
        console.log('A-beforeMount')
    },
    mounted() {
        console.log('A-mounted')
    },
    beforeUpdate() {
        console.log('A-beforeUpdate')
    },
    updated() {
        console.log('A-updated')
    },
    beforeDestroy() {
        console.log('A-beforeDestroy')
    },
    destroyed() {
        console.log('A-destroyed')
    },
    activated() {
        console.log('A-actived')
    },
    deactivated() {
        console.log('A-deactived')
    },
})

Vue.component('bComp', {
    template: `
        <div>
            <h1>{{ name }}</h1>
            <button @click="handleClick">B-触发更新</button>
        </div>
    `,
    data() {
        return {
            name: 'BComp'
        }
    },
    methods: {
        handleClick() {
            this.name = 'B'
        }
    },
    beforeCreate() {
        console.log('B-beforeCreate')
    },
    created() {
        console.log('B-created')
    },
    beforeMount() {
        console.log('B-beforeMount')
    },
    mounted() {
        console.log('B-mounted')
    },
    beforeUpdate() {
        console.log('B-beforeUpdate')
    },
    updated() {
        console.log('B-updated')
    },
    beforeDestroy() {
        console.log('B-beforeDestroy')
    },
    destroyed() {
        console.log('B-destroyed')
    },
    activated() {
        console.log('B-actived')
    },
    deactivated() {
        console.log('B-deactived')
    },
})

const vm = new Vue({
    el: '#app',
    data() {
        return {
            componentName: 'aComp'
        }
    },
    methods: {
        handleChange() {
            if(this.componentName === 'aComp') {
                this.componentName = 'bComp'
            } else {
                this.componentName = 'aComp'
            }
        }
    }
})

</script>
-
errorCaptured
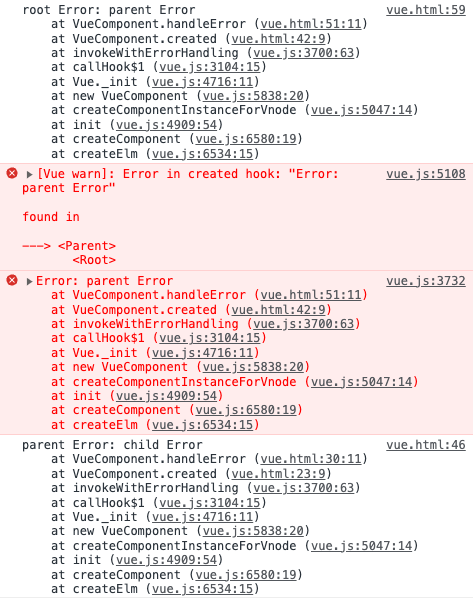
errorCaptured是 vue 中错误捕获钩子,用于捕获后代组件抛出的错误。vue 中组件的异常错误会通过组件树一层一层向上冒泡,直至冒泡至根节点,而errorCaptured是根组件或者父组件捕获其子组件或者后代组件异常错误的钩子。简而言之,子组件抛出的错误,可以通过父组件的
errorCaptured钩子捕获,也可以向更上层的根组件冒泡,如果父组件的errorCaptured钩子返回 false,则根组件的errorCaptured钩子无法捕获异常。errorCaptured钩子函数接收三个参数,分别为 error 对象,抛出错误的组件实例 vm 以及一个错误描述字符串。<div id="app"> <parent></parent> </div> <script type="text/javascript"> Vue.component('child', { template: ` <div> <h1>this is child</h1> </div> `, created() { this.handleError() }, errorCaptured(err, vm) { console.log('child', err, vm) }, methods: { handleError() { throw new Error('child Error') } }, }) Vue.component('parent', { template: ` <div> <child></child> </div> `, created() { this.handleError() }, errorCaptured(err, vm) { console.log('parent', err, vm) return false }, methods: { handleError() { throw new Error('parent Error') } }, }) const vm = new Vue({ el: '#app', errorCaptured(err, vm){ console.log('root', err, vm) }, }) </script>
Source Options
-
directives
-
filters
-
components
Compostion Options
-
parent
-
mixins
-
extends
-
provide / inject
Other Options
-
name
-
delimiters
-
functional
-
model
-
inheritAttrs
-
comments
静态方法
vue2 中实例方式是全局 API,是实例方法的延伸。
extend
component
nextTick
set
delete
directive
filter
use
mixin
compile
observable
version
静态属性
vue2 中静态属性只有一个 config 配置属性,config 是一个配置对象属性,包含多个具体属性配置。
config
-
silent
-
optionMergeStrategies
-
devtools
-
errorHandler
-
warnHandler
-
ignoredElements
-
keyCodes
-
performance
-
productionTip
实例方法
Data Method
Event Method
LifeCycle Method
实例属性
vue2 中实例属性实际为组件属性。
data
props
el
options
parent
children
root
slots
scopedSlots
refs
isServer
attrs
listeners
内置组件
component
transition
transition-group
keep-alive
slot
内置指令
v-text
v-html
v-show
v-if
v-else
v-else-if
v-for
v-on
v-bind
v-model
v-slot
v-pre
v-cloak
v-once
特殊属性
key
ref
is
slot
slot-scope
scope
后记
尽管 vue2 不再支持,在框架的变更节点上的我们,势必要同时面对 vue2 和 vue3 项目,既不可抛弃旧爱 vue2,又必须另找新欢 vue3,尽力“渣”下去吧!
