命令模式又称为行动 交易模式,属于行为型模式;是指将一个请求封装为一个对象,使发出请求的责任和执行请求的责任分割开。这样两者之间通过命令对象进行沟通,这样方便
命令模式又称为行动/交易模式,属于行为型模式;是指将一个请求封装为一个对象,使发出请求的责任和执行请求的责任分割开。这样两者之间通过命令对象进行沟通,这样方便将命令对象进行储存、传递、调用、增加与管理。命令模式是对命令的封装。命令模式把发出命令的责任和执行命令的责任分割开,委派给不同的对象。
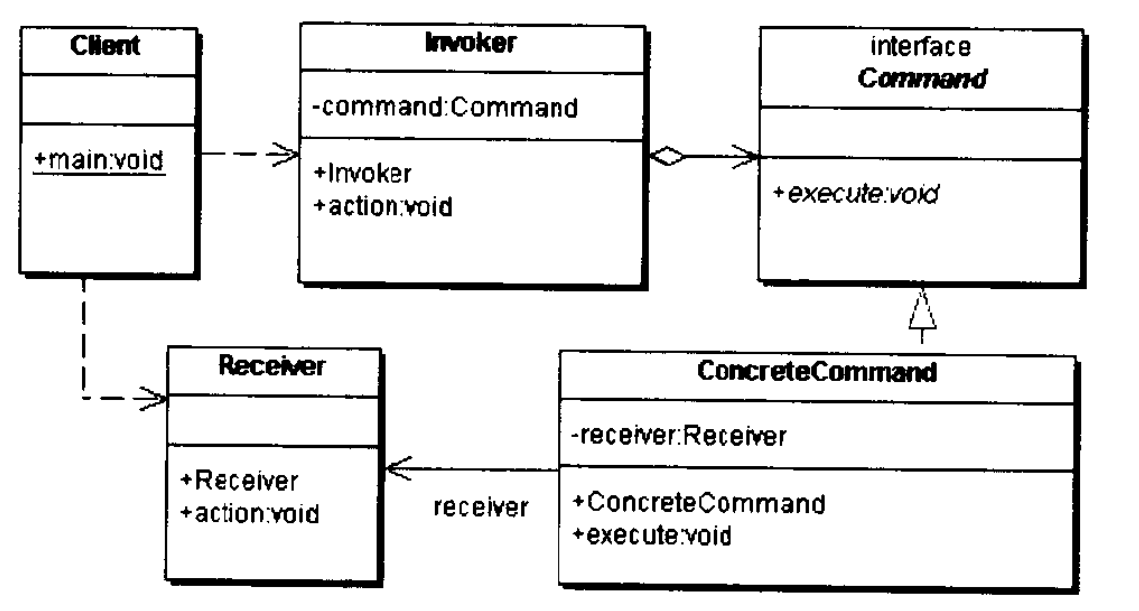
命令模式的UML类图如下:

从上图可知,命令模式涉及到抽象命令角色、具体命令角色、请求者角色、接收者角色、客户端角色等五个角色:
- 命令(Command)角色:声明了一个给所有具体命令类的抽象接口。这是一个抽象角色,通常由一个Java接口或Java抽象类实现。
- 具体命令(ConcreteCommand)角色:定义一个接收者和行为之间的弱耦合;实现execute()方法,负责调用接收者的相应操作。execute()方法通常叫做执行方法。
- 请求者(Invoker)角色:负责调用命令对象执行请求,相关的方法叫做行动万法。
- 接收者(Receiver)角色:负责具体实施和执行一个请求。任何一个类都可以成为接收者,实施和执行请求的方法叫做行动方法。
- 客户(Client)角色:创建了一个具体命令(ConcreteCommand)对象并确定其接收者。
命令模式的执行顺序如下:
- 客户端创建一个ConcreteCommand对象,并指明接收者
- 请求者对象保存了ConcreteCommand对象
- 请求者对象通过调用execute()方法发出请求,如果命令是能撤销的,那么ConcreteCommand保存了调用execute()方法之前的状态。
- ConcreteCommand对象调用接受者一方的方法执行请求
智能家电的例子
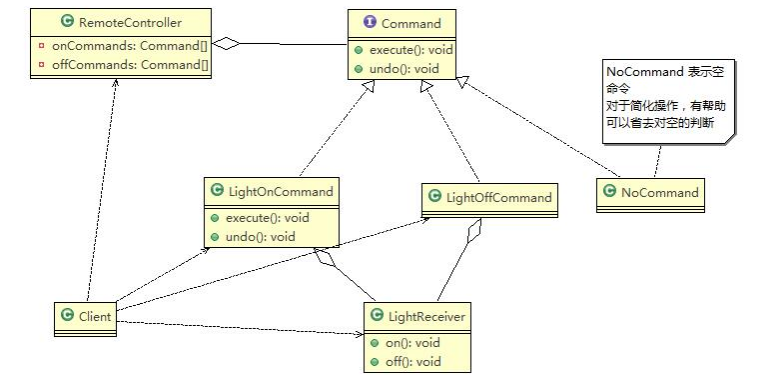
现在物联网发展越来越快,智能家电发展越来越迅速。接下来用一个移动APP管理智能家电,通过移动管理电灯、电视机的打开为例讲解命令模式。
智能家电的UML类图:

接收者角色:
package com.charon.command;

/**
 * @className: LightReceiver
 * @description: 命令接收者
 * @author: charon
 * @create: 2022-03-26 22:13
 */
public class LightReceiver {

    public void on(){
        System.out.println("电灯打开了。。。。");
    }

    public void off(){
        System.out.println("电灯关闭了。。。。");
    }
}
抽象命令角色:
package com.charon.command;

/**
 * @className: Command
 * @description: 命令接口
 * @author: charon
 * @create: 2022-03-26 22:12
 */
public interface Command {

    /**
     * 执行操作
     */
    void execute();

    /**
     * 撤销操作
     */
    void undo();
}
具体命令角色:
package com.charon.command;

/**
 * @className: LightOnCommand
 * @description:
 * @author: charon
 * @create: 2022-03-26 22:15
 */
public class LightOnCommand implements Command{

    private LightReceiver light;

    public LightOnCommand(LightReceiver receiver) {
        this.light = receiver;
    }

    /**
     * 重写执行方法
     */
    @Override
    public void execute() {
        light.on();
    }

    @Override
    public void undo() {
        light.off();
    }
}


package com.charon.command;

/**
 * @className: LightOffCommand
 * @description:
 * @author: charon
 * @create: 2022-03-26 22:17
 */
public class LightOffCommand implements Command{

    private LightReceiver light;

    public LightOffCommand(LightReceiver light) {
        this.light = light;
    }

    @Override
    public void execute() {
        light.off();
    }

    @Override
    public void undo() {
        light.on();
    }
}


package com.charon.command;

/**
 * @className: NoCommand
 * @description: 空命令方法,用于初始化每个按钮,当调用空命令时,对象什么都不做
 *     			这也是一种设计模式,可以省略掉对空的判断
 * @author: charon
 * @create: 2022-03-26 22:19
 */
public class NoCommand implements Command {
    @Override
    public void execute() {

    }

    @Override
    public void undo() {

    }
}
命令控制类:
package com.charon.command;

/**
 * @className: RemoteController
 * @description: 命令控制类
 * @author: charon
 * @create: 2022-03-26 22:20
 */
public class RemoteController {

    /**
     * 开关按钮的命令,声明为数组是为了扩展其他的命令
     */
    Command[] onCmds,offCmds;

    /**
     * 撤销的命令
     */
    Command undoCmd;

    /**
     * 初始化
     */
    public RemoteController() {
        onCmds = new Command[5];
        offCmds = new Command[5];

        for (int i = 0; i < 5; i++) {
            onCmds[i] = new NoCommand();
            offCmds[i] = new NoCommand();
        }
    }

    /**
     * 设置命令
     * @param no 命令编号
     * @param onCmd 打开命令
     * @param offCmd 关闭命令
     */
    public void setCommand(int no,Command onCmd,Command offCmd){
        onCmds[no] = onCmd;
        offCmds[no] = offCmd;
    }

    /**
     * 按下开的命令
     * @param no 命令编号
     */
    public void onButtonWasPushed(int no){
        // 找到对应的编号,调用对应的方法
        onCmds[no].execute();
        // 记录这次操作,用于撤销操作
        undoCmd = onCmds[no];
    }

    /**
     * 按下关的命令
     * @param no 命令编号
     */
    public void offButtonWasPushed(int no){
        // 找到对应的编号,调用对应的方法
        offCmds[no].execute();
        // 记录这次操作,用于撤销操作
        undoCmd = offCmds[no];
    }

    /**
     * 按下撤销操作
     */
    public void undoButtonWasPushed(){
        undoCmd.undo();
    }
}
测试:
package com.charon.command;

/**
 * @className: Client
 * @description:
 * @author: charon
 * @create: 2022-03-26 22:30
 */
public class Client {

    public static void main(String[] args) {
        // 创建命令的接收者
        LightReceiver lightReceiver = new LightReceiver();
        // 创建开/关的命令
        LightOnCommand lightOnCommand = new LightOnCommand(lightReceiver);
        LightOffCommand lightOffCommand = new LightOffCommand(lightReceiver);
        // 创建命令控制器
        RemoteController controller = new RemoteController();
        // 给遥控器设置命令,比如 0 是电灯的开关操作
        controller.setCommand(0,lightOnCommand,lightOffCommand);
        System.out.println("按下电灯的开按钮:" );
        controller.onButtonWasPushed(0);
        System.out.println("按下电灯的关按钮:" );
        controller.offButtonWasPushed(0);
        System.out.println("按下电灯的撤销按钮:" );
        controller.undoButtonWasPushed();

    }
}

打印:
    按下电灯的开按钮:
    电灯打开了。。。。
    按下电灯的关按钮:
    电灯关闭了。。。。
    按下电灯的撤销按钮:
    电灯打开了。。。。
如上面的代码所示,命令模式就已经完成了。如果接下来需要添加一个智能电视机,就只需要添加命令接收者和具体的命令类就行了:
package com.charon.command;

/**
 * @className: TVReceiver
 * @description:
 * @author: charon
 * @create: 2022-03-26 22:48
 */
public class TVReceiver {
    public void on(){
        System.out.println("电视机打开了。。。。");
    }

    public void off(){
        System.out.println("电视机关闭了。。。。");
    }
}


package com.charon.command;

/**
 * @className: TVOnCommand
 * @description:
 * @author: charon
 * @create: 2022-03-26 22:49
 */
public class TVOnCommand implements Command{

    private TVReceiver tv;

    public TVOnCommand(TVReceiver tv) {
        this.tv = tv;
    }

    @Override
    public void execute() {
        tv.on();
    }

    @Override
    public void undo() {
        tv.off();
    }
}


package com.charon.command;

/**
 * @className: TVOffCommand
 * @description:
 * @author: charon
 * @create: 2022-03-26 22:50
 */
public class TVOffCommand implements Command{
    private TVReceiver tv;

    public TVOffCommand(TVReceiver tv) {
        this.tv = tv;
    }

    @Override
    public void execute() {
        tv.off();
    }

    @Override
    public void undo() {
        tv.on();
    }
}
测试:
package com.charon.command;

/**
 * @className: Client
 * @description:
 * @author: charon
 * @create: 2022-03-26 22:30
 */
public class Client {

    public static void main(String[] args) {
        TVReceiver tvReceiver = new TVReceiver();
        TVOnCommand tvOnCommand = new TVOnCommand(tvReceiver);
        TVOffCommand tvOffCommand = new TVOffCommand(tvReceiver);
        // 创建命令控制器
        RemoteController remoteController = new RemoteController();
        // 给遥控器设置命令,比如 0 是电灯的开关操作
        remoteController.setCommand(0,lightOnCommand,lightOffCommand);
        System.out.println("按下电视机的开按钮:" );
        remoteController.onButtonWasPushed(0);
        System.out.println("按下电视机的关按钮:" );
        remoteController.offButtonWasPushed(0);
        System.out.println("按下电视机的撤销按钮:" );
        remoteController.undoButtonWasPushed();
        System.out.println("按下电视机的开按钮:" );
        remoteController.offButtonWasPushed(0);
        System.out.println("按下电视机的撤销按钮:" );
        remoteController.undoButtonWasPushed();

    }
}

打印:
    按下电视机的开按钮:
    电灯打开了。。。。
    按下电视机的关按钮:
    电灯关闭了。。。。
    按下电视机的撤销按钮:
    电灯打开了。。。。
    按下电视机的开按钮:
    电灯关闭了。。。。
    按下电视机的撤销按钮:
    电灯打开了。。。。
命令模式的优点如下:
- 通过引入中间件(抽象接口)降低系统的耦合度。
- 扩展性良好,增加或删除命令非常方便。采用命令模式增加与删除命令不会影响其他类,且满足“开闭原则”。
- 可以实现宏命令。命令模式可以与组合模式结合,将多个命令装配成一个组合命令,即宏命令。
- 方便实现 Undo 和 Redo 操作。命令模式可以与后面将要介绍的备忘录模式结合,实现命令的撤销与恢复。
- 可以在现有命令的基础上,增加额外功能。比如日志记录,结合装饰器模式会更加灵活。
命令模式的缺点如下:
- 可能产生大量具体的命令类。因为每一个具体操作都需要设计一个具体命令类,这会增加系统的复杂性。
- 命令模式的结果其实就是接收方的执行结果,但是为了以命令的形式进行架构、解耦请求与实现,引入了额外类型结构(引入了请求方与抽象命令接口),增加了理解上的困难。不过这也是设计模式的通病,抽象必然会额外增加类的数量,代码抽离肯定比代码聚合更加难理解。
命令模式的应用场景
当系统的某项操作具备命令语义,且命令实现不稳定(变化)时,可以通过命令模式解耦请求与实现。使用抽象命令接口使请求方的代码架构稳定,封装接收方具体命令的实现细节。接收方与抽象命令呈现弱耦合(内部方法无需一致),具备良好的扩展性。
命令模式通常适用于以下场景:
- 请求调用者需要与请求接收者解耦时,命令模式可以使调用者和接收者不直接交互。
- 系统随机请求命令或经常增加、删除命令时,命令模式可以方便地实现这些功能。
- 当系统需要执行一组操作时,命令模式可以定义宏命令来实现该功能。
- 当系统需要支持命令的撤销(Undo)操作和恢复(Redo)操作时,可以将命令对象存储起来,采用备忘录模式来实现。
本文版权归Charon和博客园共有,原创文章,欢迎转载,但未经作者同意必须保留此段声明,且在文章页面明显位置给出原文连接,否则保留追究法律责任的权利。

