React实现插槽
在开发中,我们抽取了一个组件,但是为了让这个组件具备更强的通用性,我们不能将组件中的内容限制为固定的div、span等等这些元素。
我们应该让使用者可以决定某一块区域到底存放什么内容

这种需求在Vue当中有一个固定的做法是通过slot来完成的,React呢?
在React中是没有插槽的概念的, 或者说在React中是不需要插槽的, 因为React对于这种需要插槽的情况非常灵活,有两种方案可以实现:
组件的children子元素;
props属性传递React元素;
children实现插槽
每个组件都可以获取到 props.children:它包含组件的开始标签和结束标签之间的内容。
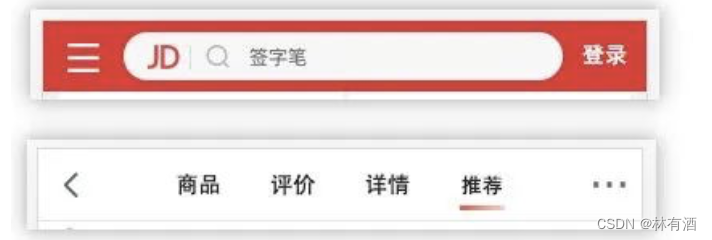
例如我们实现一个navbar, 要求左边, 中间, 右边的内容是不固定的, 由使用者来决定到底放什么
在父组件的子组件标签中写入要插入到子组件的元素
import React, { Component } from 'react'
import NavBar from './c-cpns/NavBar'

export class App extends Component {
  render() {
    return (
      <div>
        {/* 父组件将要插入到子组件的元素写到组件标签中 */}
        <NavBar>
          <button>按钮</button>
          <h2>标题</h2>
          <i>斜体</i>
        </NavBar>
      </div>
    )
  }
}

export default App
在子组件中通过this.props可以获取到一个children属性, 该属性中包含子组件标签开始到结束之间的内容
import React, { Component } from 'react'
import './style.css'

export class NavBar extends Component {
  render() {
    // 在子组件通过props中的children, 获取到要插入的元素
    const { children } = this.props
    return (
      <div className='nav-bar'>
        <div className='left'>
          {children[0]}
        </div>
        <div className='center'>
          {children[1]}
        </div>
        <div className='right'>
          {children[2]}
        </div>
      </div>
    )
  }
}

export default NavBar
注意: 如果children中有多个元素, 那么children是一个数组, 数组中存放着所有内容; 如果只插入一个元素到子组件中, 那么children本身就是插入的该元素, 如下:
父组件中只插入了一个元素
return (
  <div>
    {/* 父组件将要插入到子组件的元素写到组件标签中 */}
    <NavBar>
      <button>按钮</button>
    </NavBar>
  </div>
)
子组件直接使用children即可
render() {
  // 在子组件通过props中的children, 获取到要插入的元素
  const { children } = this.props
  return (
    <div className='nav-bar'>
      <div className='left'>
        {children}
      </div>
    </div>
  )
}
props实现插槽
通过children实现的方案虽然可行,但是有一个弊端:通过索引值获取传入的元素很容易出错,不能精准的获取传入的原生;
而且对顺序有严格的要求
另外一个种方案就是使用 props 实现(这个方案也是开发中使用的比较多的方案, 个人更推荐):
我们之间通过具体的属性名,可以让我们在传入和获取时更加的精准;
首先在父组件通过props的方式将要插入的元素传入到子组件中
render() {
  // 在子组件通过props中的children, 获取到要插入的元素
  const { children } = this.props
  return (
    <div className='nav-bar'>
      <div className='left'>
        {children}
      </div>
    </div>
  )
}
再在子组件中获取到传递的数据进行展示
import React, { Component } from 'react'

export class NavBarTow extends Component {
  render() {
    // 在子组件中获取到父组件传递过来的数据
    const { leftSlot, centerSlot, rightSlot } = this.props

    return (
      <div className='nav-bar'>
        {/* 将传递过来的数据进行展示 */}
        <div className='left'>
          {leftSlot}
        </div>
        <div className='center'>
          {centerSlot}
        </div>
        <div className='right'>
          {rightSlot}
        </div>
      </div>
    )
  }
}

export default NavBarTow
到此这篇关于React中实现插槽效果的方案的文章就介绍到这了,更多相关React实现插槽内容请搜索好代码网以前的文章或继续浏览下面的相关文章希望大家以后多多支持好代码网!


