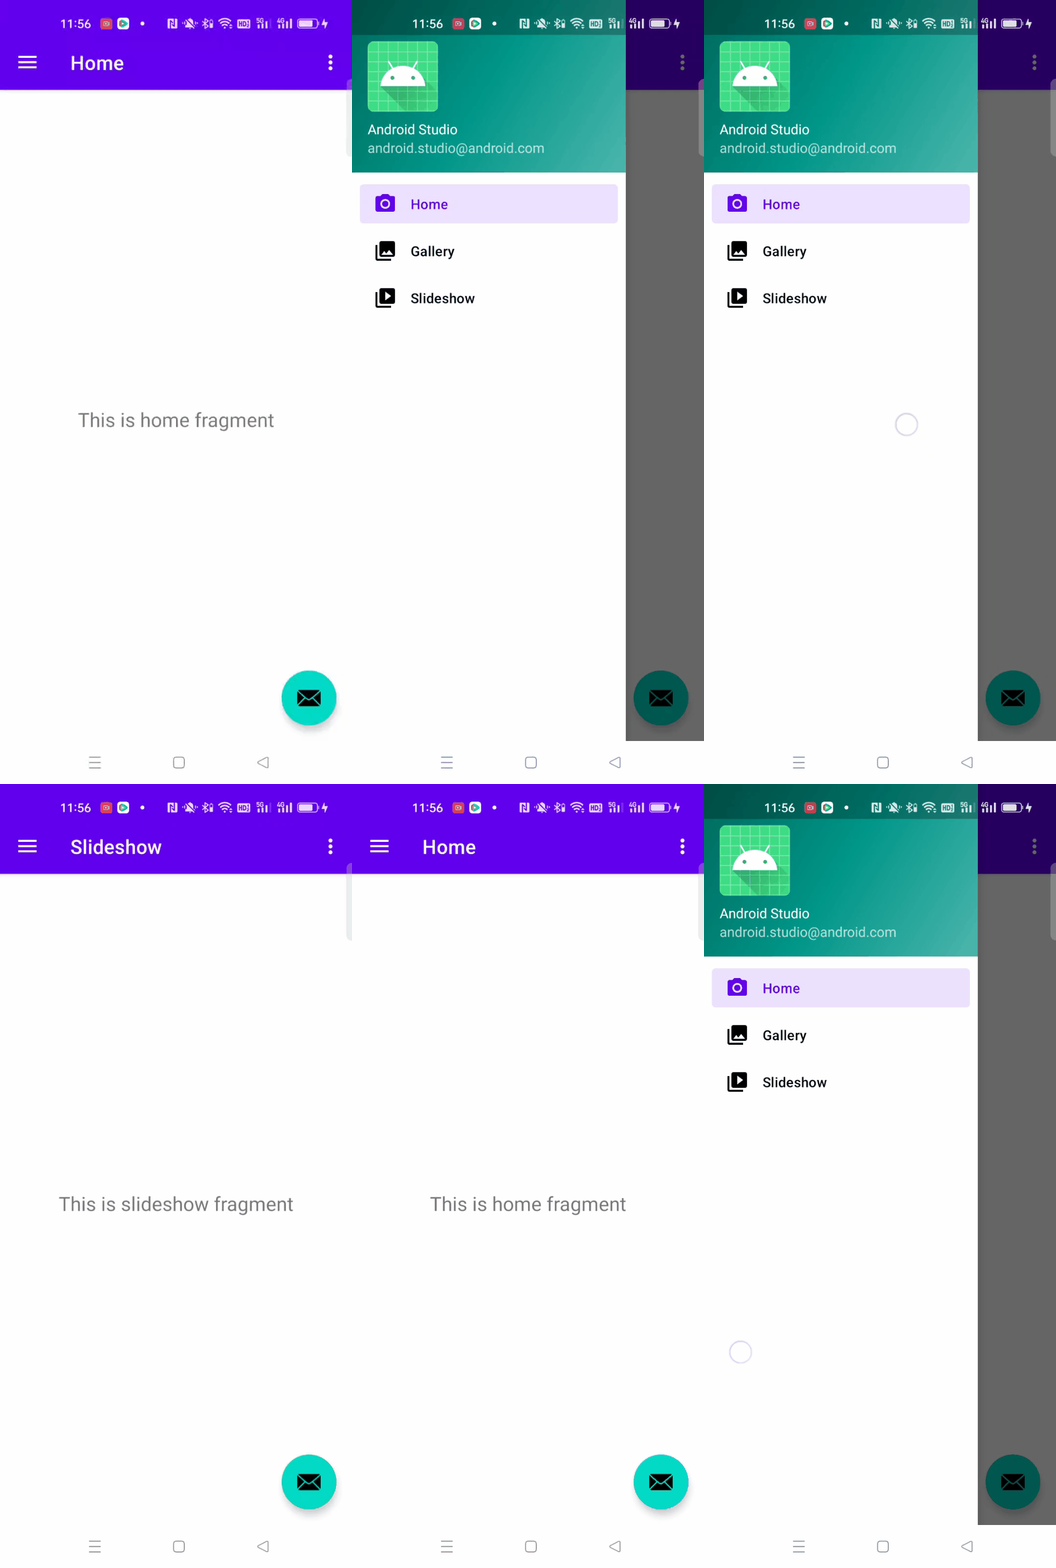
现在 Android Studio 已经直接提供左滑菜单功能,只需要在创建新项目时选择 Navigation Drawer Activity 就可以直接创建一个有左滑菜单功能的 APP。
DrawerLayout
DrawerLayout 是 support-v4 Library 包中实现了侧滑菜单效果的控件,可以说 drawerLayout 是因为第三方控件如 MenuDrawer 等的出现之后,Google 借鉴而出现的产物。DrawerLayout 分为侧边菜单和主内容区两个部分,侧边菜单可以根据手势展开与隐藏(drawerLayout 自身特性),主内容区可以随着菜单的点击而变化。
1. 抽屉式导航栏是显示应用主导航菜单的界面面板。当用户触摸应用栏中的抽屉式导航栏图标或从屏幕的左边缘滑动手指时,就会显示抽屉式导航栏;
2. 抽屉式导航栏图标会显示在使用 DrawerLayout 的所有顶级目的地上。顶级目的地是应用的根级目的地。它们不会在应用栏中显示向上按钮。
3. 要添加抽屉式导航栏,请先声明 DrawerLayout 为根视图。在 DrawerLayout 内,为主界面内容以及包含抽屉式导航栏内容的其他视图添加布局。
4. 例如,以下布局使用含有两个子视图的 DrawerLayout: 包含主要内容的 NavHostFragment 和适用于抽屉式导航栏内容的 NavigationView。
<?xml version="1.0" encoding="utf-8"?>
<!-- Use DrawerLayout as root container for activity -->
<android.support.v4.widget.DrawerLayout
    xmlns:android="http://schemas.android.com/apk/res/android"
    xmlns:app="http://schemas.android.com/apk/res-auto"
    android:id="@+id/drawer_layout"
    android:layout_width="match_parent"
    android:layout_height="match_parent"
    android:fitsSystemWindows="true">
    <fragment
        android:name="androidx.navigation.fragment.NavHostFragment"
        android:id="@+id/nav_host_fragment"
        android:layout_width="match_parent"
        android:layout_height="match_parent"
        app:defaultNavHost="true"
        app:navGraph="@navigation/mobile_navigation" />
    <android.support.design.widget.NavigationView
        android:id="@+id/nav_view"
        android:layout_width="wrap_content"
        android:layout_height="match_parent"
        android:layout_gravity="start"
        android:fitsSystemWindows="true" />
</android.support.v4.widget.DrawerLayout>
android:name 指定 NavHost 的实现类,这里是 NavHostFragment;
app:defaaultNavHost="true" 拦截系统返回键,当用户按下返回键时,系统会将正在展示的 Fragment 返回。
app:navGraph 关联导航图;mobile_navigation.xml 是放在 res --> navigation 文件加里,是一个包含导航目的地(fragment)的菜单;
mobile_navigation.xml 具体内容
<?xml version="1.0" encoding="utf-8"?>
<navigation xmlns:android="http://schemas.android.com/apk/res/android"
    xmlns:app="http://schemas.android.com/apk/res-auto"
    xmlns:tools="http://schemas.android.com/tools"
    android:id="@+id/mobile_navigation"
    app:startDestination="@+id/nav_home">
    <fragment
        android:id="@+id/nav_home"
        android:name="com.example.leftnavigationbar.ui.home.HomeFragment"
        android:label="@string/menu_home"
        tools:layout="@layout/fragment_home" />
    <fragment
        android:id="@+id/nav_gallery"
        android:name="com.example.leftnavigationbar.ui.gallery.GalleryFragment"
        android:label="@string/menu_gallery"
        tools:layout="@layout/fragment_gallery" />
    <fragment
        android:id="@+id/nav_slideshow"
        android:name="com.example.leftnavigationbar.ui.slideshow.SlideshowFragment"
        android:label="@string/menu_slideshow"
        tools:layout="@layout/fragment_slideshow" />
</navigation>
android:id 必填项,后面 fragment跳转的时候要用到;
android:name Fragment 的全路径;
android:label 要跳转的 Fragment 在菜单里的名字
tools:layout Fragment 的布局;
NavigationView
NavigationView 表示应用程序的标准导航菜单,菜单内容可以由菜单资源文件填充。NavigationView 通常放在 DrawerLayout 中,可以实现侧滑效果的 UI 。DrawerLayout 布局可以有3个子布局,第一个布局必须是主界面而且不可以不写,其他2个布局就是左、右两个侧滑布局,左右两个侧滑布局可以只写其中一个。
android:laoyout_gravity 值为 start 则是从左侧滑出,值为 end 则是从右侧滑出;
android:layout_gravity="start"
android:layout_gravity="end"
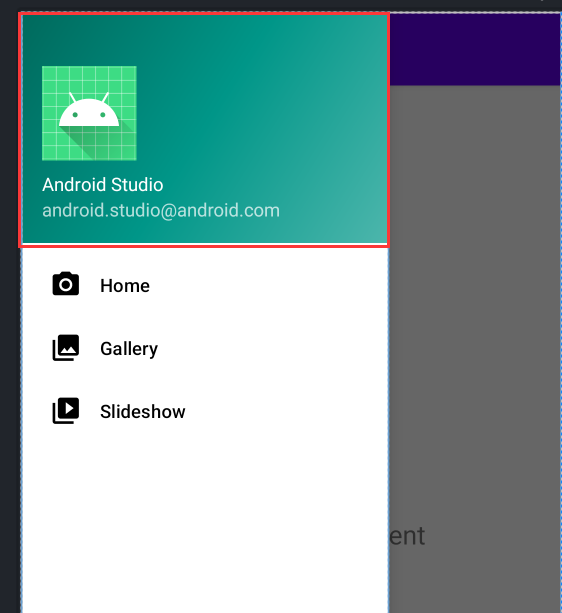
app:headerLayout 给 NavigationView 设置头文件;
app:headerLayout="@layout/nav_header_main"
nav_header_man.xml 是包含头部布局样式的布局文件。
app:menu NavigationView 是通过菜单形式在布局中放置元素的,值为自己创建的菜单文件;
app:menu="@menu/activity_main_drawer"
在 src 下新建一个 menu 文件夹,activity_main_drawer.xml 是放在 menu 下的菜单布局文 件。里面是 Home / Gallery / Slideshow 等 item。可以设置每个 item 的 title、icon等。

app:itemIconTint 设置菜单图标的颜色;
app:itemTextColor 设置菜单文字的颜色;
app:itemBackground 设置菜单背景的颜色;
android:src与app:srcCompat
二者几乎没有区别,都是加载图片资源。
app:srcCompat将矢量可绘制对象集成到应用程序中。矢量可绘制对象允许您用XML中定义的单个矢量图形替换多个png资产。从Android支持库23.3.0开始,支持向量可绘制对象只能通过加载app:srcCompat。
app:srcCompat设置一个可绘制对象作为此ImageView的内容,它将以其原始大小显示。
fitsSystemWindows
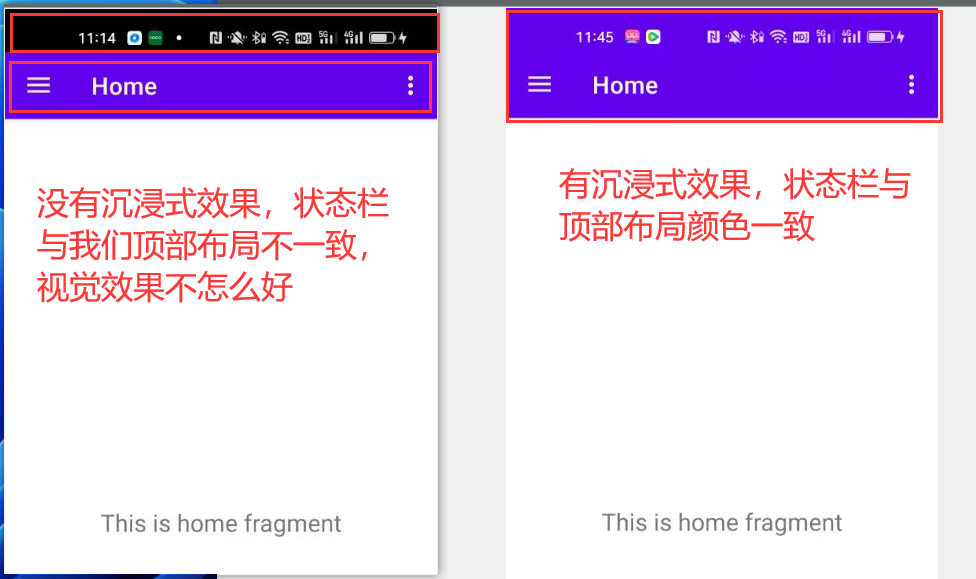
android:fitsSystemWindows="true" 实现沉浸式状态栏效果。
android 手机顶部用于显示各种通知和状态信息的这个栏叫做状态栏。通常情况下,我们应用程序的内容都是显示在状态栏下方的,但是为了更好的视觉效果,我们希望将应用程序顶部的背景颜色延申到状态栏的背后,这种效果就称之为沉浸式状态栏。
把android:fitsSystemWindows 属性设置为 true 为打开沉浸式状态栏效果,false 为关闭沉浸式状态栏效果。同时需要在逻辑代码里把状态栏的背景改成透明色,才能看到效果。加上如下代码:
getWindow().setStatusBarColor(Color.TRANSPARENT);
注意:android:fitsSystemWindows="true" 顶级布局必须是 CoordinatorLayout,否则也看不到效果。
到此这篇关于Android DrawerLayout布局与NavigationView导航菜单应用的文章就介绍到这了,更多相关Android DrawerLayout与NavigationView内容请搜索好代码网以前的文章或继续浏览下面的相关文章希望大家以后多多支持好代码网!

